You will need: an old bedsheets or some light colours fabric you don't mind cutting up, a hammer, kitchen roll, some flowers, a hard surface that you can bang a hammer on! Hand extras are a hole punch or a needle and thread, some ribbon or twine.
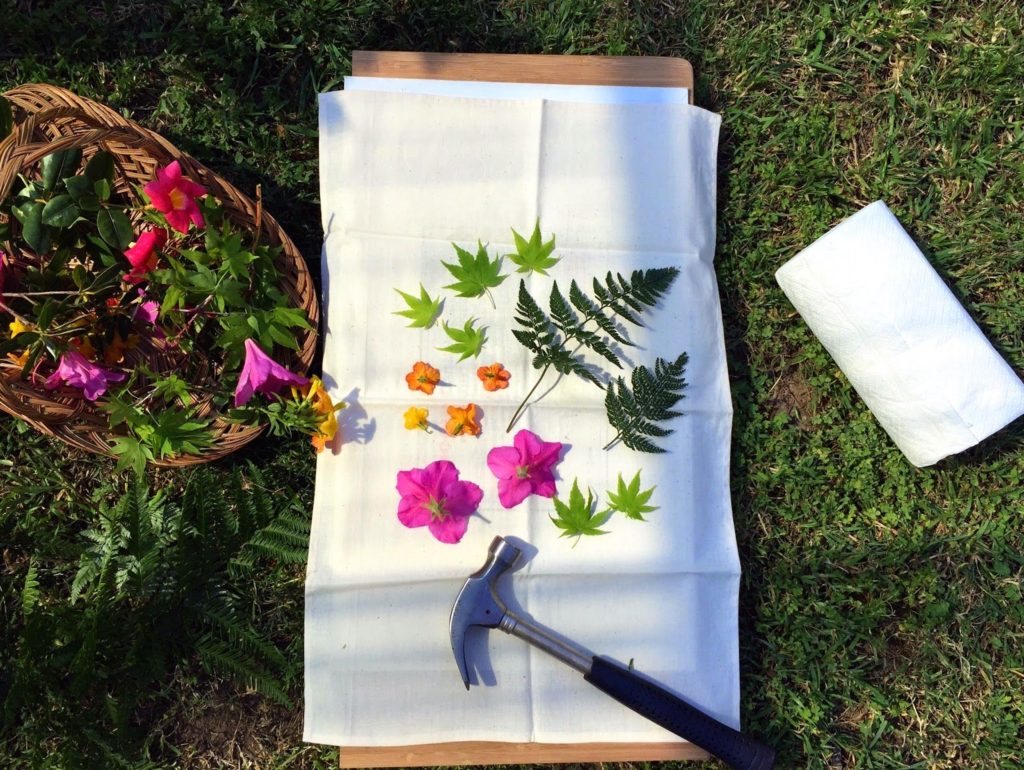
Firstly, you need to collect your flowers and leaves. We recommend you collect more than you need as this week is flower week here a Time and Tide Bell so you might also want to press the flowers for tomorrow and Thursday. If that's the case, see the post about pressing flowers here.
When you collect the flowers and leaves, try to collect ones which are relatively flat already - they make the best pictures! Next, you need to cut out triangular shapes from the fabric you already have. (although this works on anything - my children have flower t-shirts they made using the same technique).
Now for the fun bit! You need a flat surface that you don't mind getting marked when its bashed with a hammer. At the bottom place the fabric. Position the flowers where you want them, face down. Place the kitchen towel on top, then bash over and over agin as hard as you can. You know when its ready, as the picture of the flower will bleed through onto the kitchen towel. Then repeat with other flowers until it is just how you want it (it is much easier to do 1 flower at a time, than to do lots at once).

Once they are printed, leave to dry. Either punch holes through and thread some ribbon/twine onto it or sew it on. Then hang up to admire!
We are doing the 30 days wild for the Wildlife trusts. Today, they have a fantastic wildlife bingo you can take part in. It's available to download here. And is a lot of fun.
A journey stick is a real fun way of being able to recount a journey or adventure. It is not only great fun, but its a start to story telling. For younger ones, telling the story of a journey. For older ones, using the objects they find to describe their adventure with a richness they might otherwise find hard.
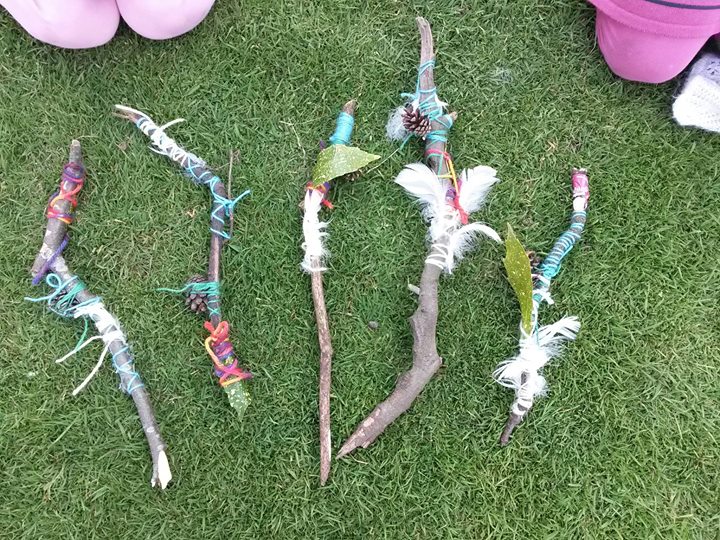
You will need: a stick, a few elastic bands or string (note if your child is younger it might be helpful to have different colours). You may want some paper for afterwards.
Step 1. Select your stick. My children really enjoy finding the 'perfect' stick for their adventure. It really doesn't matter what type of stick as long as its not too flimsy. My children really enjoy using an old potato peeler to whittle the end of their stick and then write their name on it but this is not necessary, just fun).
Step 2. Pop the elastic bands or string around it, so they are tight-ish (you're going to tuck objects you've found underneath).
Note: I usually take a few extra elastic bands so if we find more than we expected we can add them on.
Step 3: Head out on your walk. As you are walking, collect the most interesting things you find and attach them to your stick. You put them in chronological order (so start at one end and fill it along the stick). Anything of interest - one of my children loves collecting flowers. The other often finds all sorts of bits and pieces - interesting leaves, a bottle top, a flower, another stick, a feather etc.
The stick serves as a memory prompt, so being able to play, climb and find new places along the way is important.
You might want a pause once you're home, but at some point you can use the stick to re-tell the story. What did you do, what adventures did you have? If you have an older child, they might want to write up their experiences and create a magical 'wild' story. Smaller children might like to create a play or just tell the story in their own way.
There are lots of different ways you can play with this at the end. For my children, it often becomes mother natures wand...after being a spade, a space stick, a magic animal wand etc but they all find different ways to play with it.
Enjoy!
It's World Ocean Day on Monday 8th June. This week, we have produced a lot of activities that you can use every day to learn about our oceans. There are trips (virtual) to take, Science to do, things to create..... You need to download our PDF for the links to work. Click here to download.
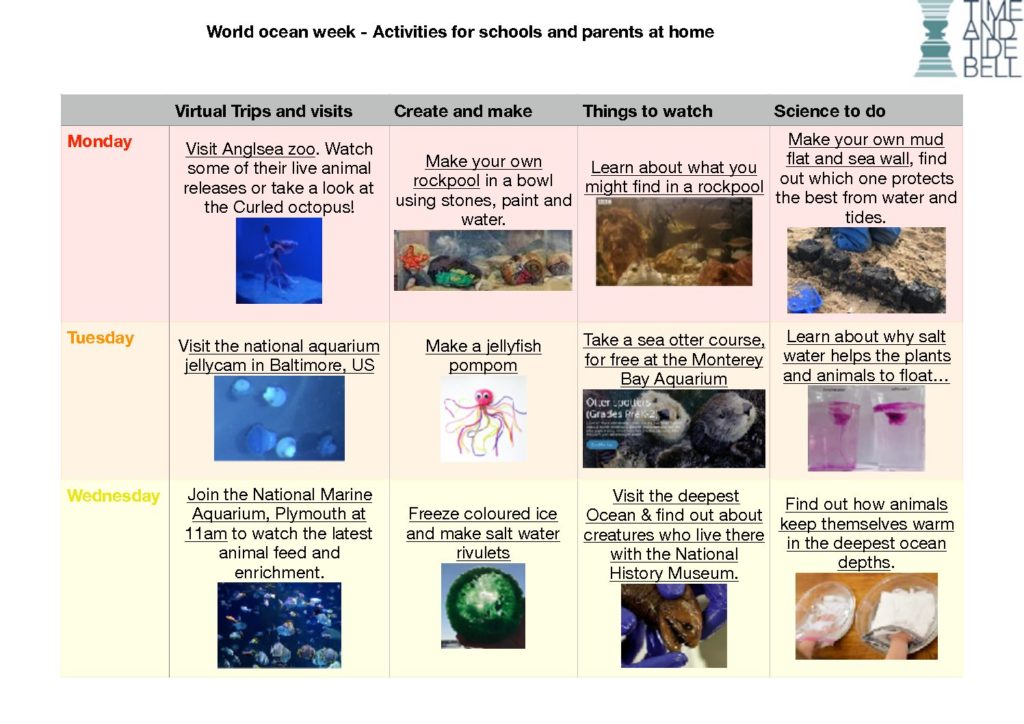
Please send us any of your makes and creates - we will post them up on a special page! All to help build up to next Monday, where you can take part in the live activities as sessions here. Enjoy!
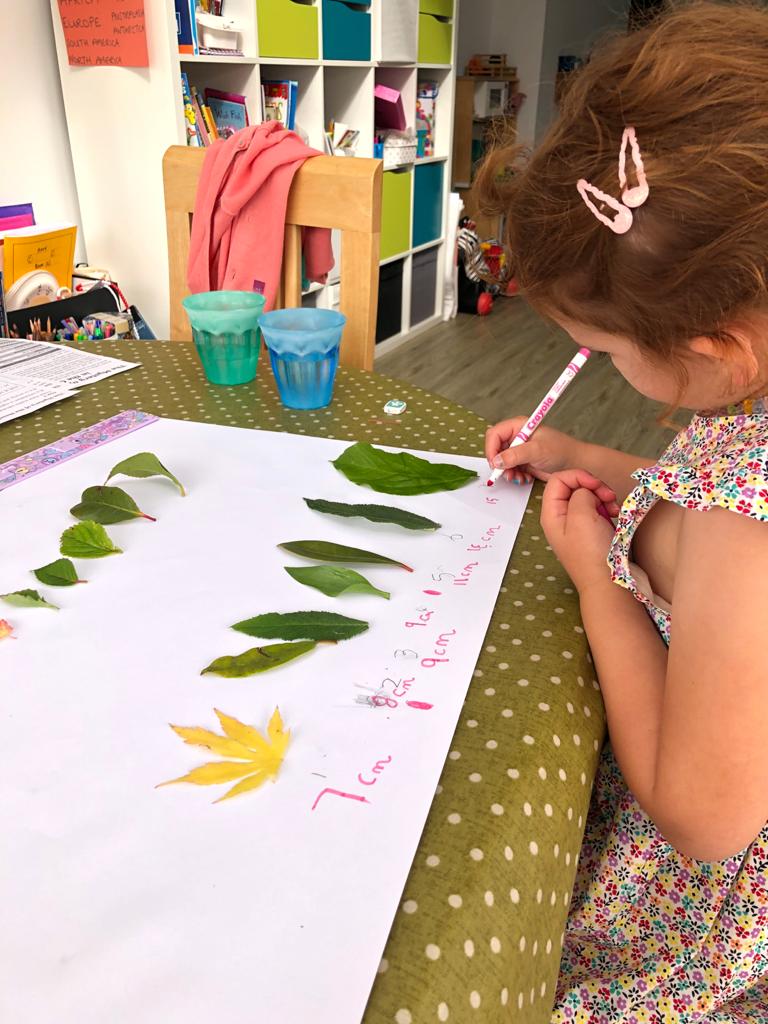
This is a lovely little activity focussing on a number of skills in a fun way.
You will need: a ruler, a pen (or chalk), leaves, paper or a patio.
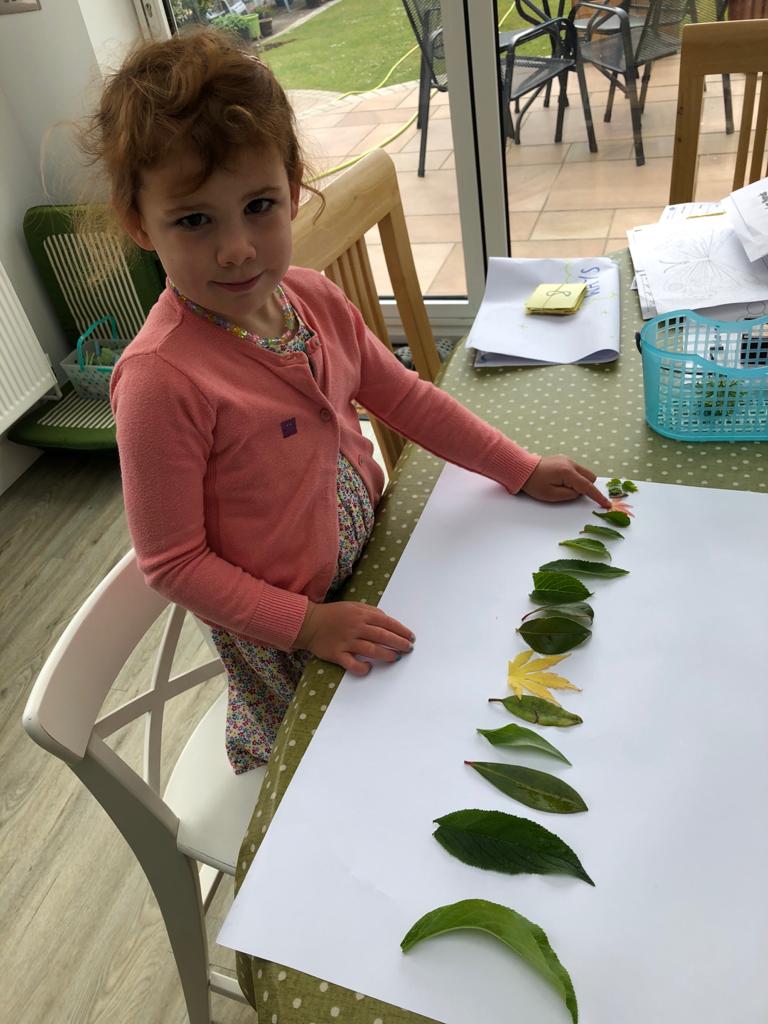
Go on a mini scavenger hunt around the garden. How many different leaf types can you find? If you are planning a walk or some exercise, then you might want to collect other leaves along the way.
On a piece of paper (or on a patio), place the leaves in size order. Then, using your ruler, measure the length of the leaf and write it below.
These make a beautiful gift for someone or look very pretty in your garden.
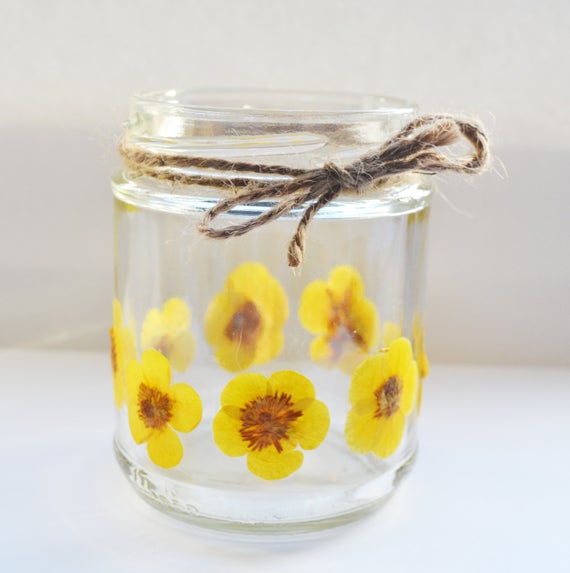
You will need: a jam jar, some flowers, a heavy book, some baking paper, some PVA glue, a small candle, PVA glue.
Collect some flowers from the garden. Take a piece of baking paper and fold it in half. Open up the paper, place the flowers face down, fold the paper over the top and then place the heavy book on top. Leave for at least 1 hour (ideally, longer). Check the flowers are flat.
If you have a microwave, place the flowers on the baking paper in the microwave and then heat in 10 second bursts until the flowers are dry (this will make the jars last a long time). If you don't, you can use the flowers before drying.
Using a paintbrush, dab some PVA glue on the inside of the jar. Stick the flowers onto the side with the glue. Then paint the PVA glue over the top. Leave to dry. Paint a second layer of PVA glue over the flowers to make sure they are protected from the rain/damp. Leave to dry again.
Now place a small tea light in the bottom of the jar and might up. The flowers look beautiful in the light and in the evening cast lovely shadows too.
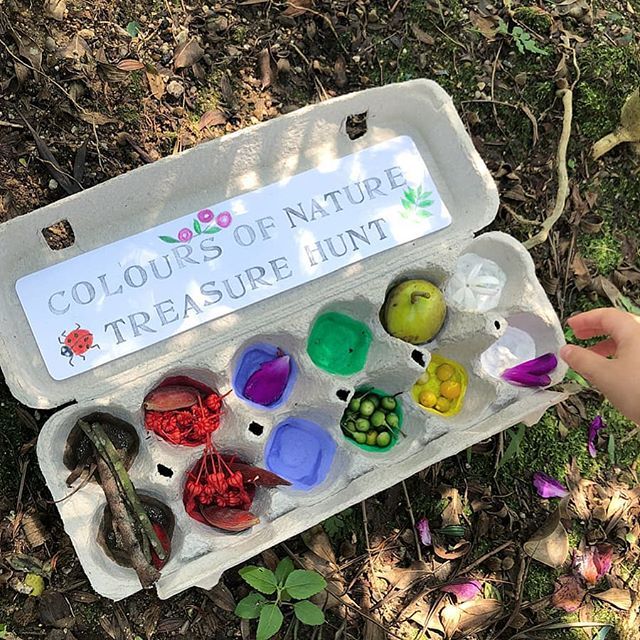
Fancy doing a colour scavenger hunt - primary colours for small children and matching colour shades from a paint chart for bigger children? Or looking for signs of summer approaching next month? The Woodland Trust have some super activities here. We particularly liked the colours and the texture ones... Enjoy!
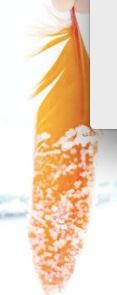
You will need: salt (quite a bit!), pegs (or something to hold the feathers up), a few feathers you have found during your outdoor exercise (or you get buy some online for craft projects), water, as many glasses or containers as you have feathers.
To begin, you need to boil the water. Whilst the water is boiling, stir in (a lot!) of salt. You need to keep stirring it in, until it will not dissolve anymore. This makes a supersaturated solution.
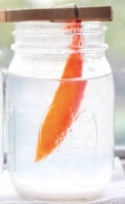
Pour the water into the container and use a peg to clip the feather in a suspend it in a jar. Wait for 3 days, and keep checking in! You will see the crystals begin to form. It looks beautiful!
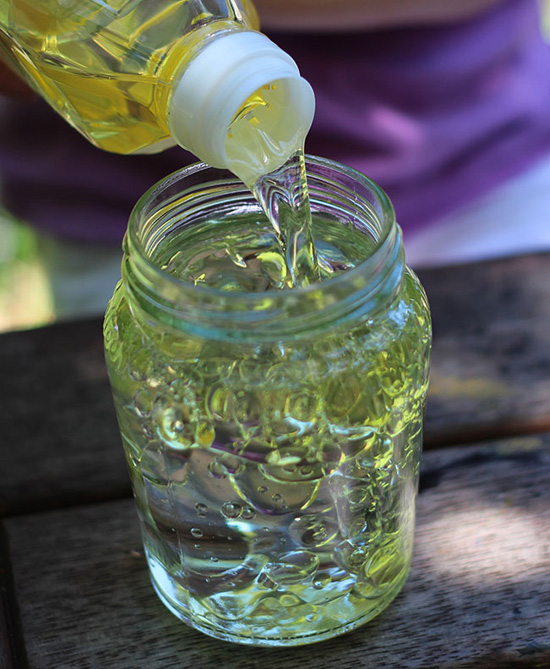
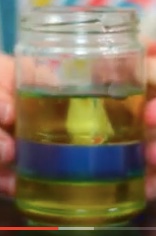
You will need: Glass jam jars (with secure lids if you want to shake them), Jug of water, Vegetable oil, Dishwashing detergent, Food colouring, Small container (as many as you have colours - we used 3), Syringes or pipettes, Optional: Table salt
1. Pour water into your jar, until it is about 3/4 full.
2. Pour vegetable oil on top of the water to fill the rest of the jar (you need space to put on the lid).
3. Watch what happens. Does the oil mix with the water? Screw the lid onto the jar and shake it…. can you make the oil and water mix? For children learning about density this is a great time to ask, “Is the vegetable oil more or less dense than the water?”
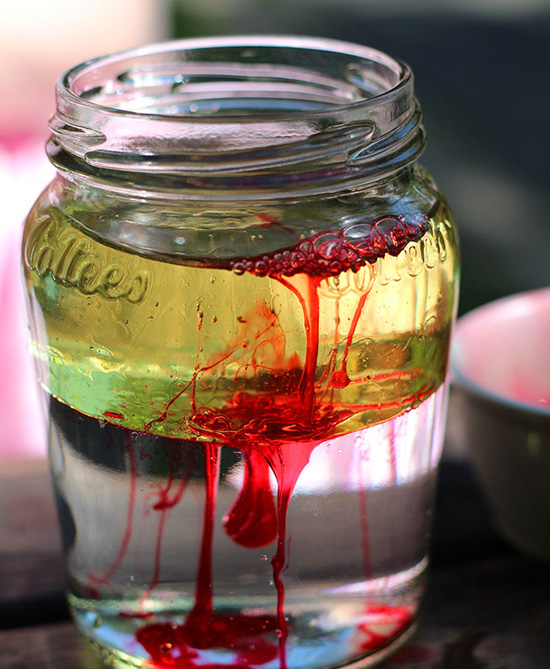
4. Mix a squirt of washing up liquid with some food colouring in a small container.
5. Using a dropper or a syringe squirt (a little at a time, great for fine motor skills) some of the coloured liquid into your jar with oil and water in.
6. Watch what happens….. you should see a lava lamp like affect with bubbles of colour falling through the mixture. Repeat this progress as many times as you like (we used different primary colours to practise colour mixing too - so blue and red, red and yellow etc)
7. If you would like to see a different reaction try pouring a teaspoon of salt into the mixture and watch what happens.
Whats happening? There are a lot of interesting things to see. Firstly oil and water do not mix. Even if you shake the jar the oil will immediately separate from the water as soon as it settles. Oil is attracted to other oil so it sticks together. The same goes for water….. so they just don’t mix – they are immiscible.
Secondly, the oil always floats on top of the water because the oil has a lower density than water.
Detergent is different again. It is attracted to both water and oil. Detergent grabs onto both causing oil droplets to be suspended in the water. When you shake the jar the detergent molecules stick the water and oil together. That's why detergent is so handy for cleaning greasy dishes!
You will need: Two glasses, fizzy water (this also works with lemonade or any other see-through fizzy drink, but it is better with fizzy water as its usually more fizzy), plain water, two see-through cups, a few raisins (10ish).
Place the two cups on a flat surface. Into one, pour the fizzy water. Into the other, pour the plain (still) water.
Pop an equal amount of raisins into the each cup (good maths language, understanding the phrase equal!) and watch what happens.
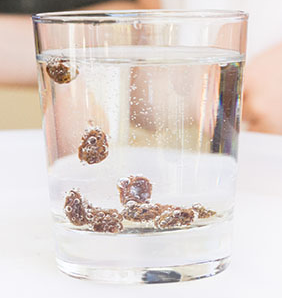
Ask your child what the difference was in the two experiments. Why do they think this is? Note: The bubbles collect on the raisins and make them bob up and down in the fizzy water and they don't move in the still water.
We have been playing about with this for a while. It's fun but will need supporting. Theres lots of versions about but we have tried to make this one only using things you should have in your cupboards already!
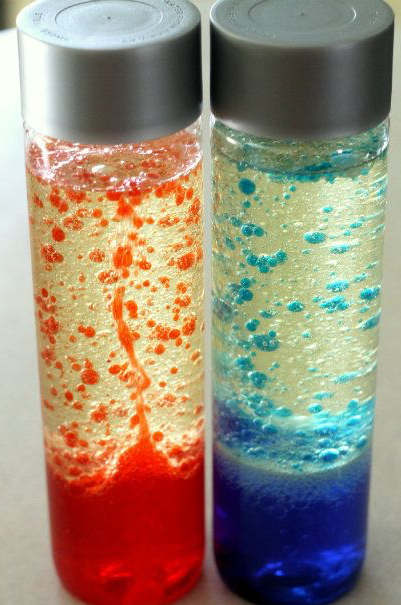
You will need; a jar, some honey (you can dye this by heating it up and mixing in gel food colouring), vegetable oil, water with any colour of food colouring you'd like.
You will need to pour the most dense liquids into the jar, first! This is vital! you might want to do a smaller test using a test tube or see through tube...! You want each stripe to be around 1 cm deep.
For a three layer jar (you might want to try this first!)
Honey goes in first as it is the most dense. Pour it straight into the jar.
Next is the blue water, pour it carefully down the side of the jar (or onto a spoon first).
Now for the vegetable oil. Pour it carefully onto the spoon first - you have to do this gently.
For a 6 layer jar (for older children or adults!) you will need; honey (if you want to dye this you can use gel food colouring, melt it a bit in the microwave with the food colouring and allow to set again, whole milk dyed purple, blue washing up liquid, water with green food colouring, vegetable oil, white spirit dyed red.
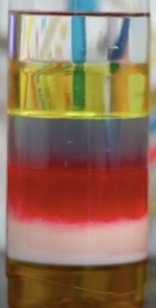
Honey goes in first
Then the whole milk (remember to pour onto your spoon!)
Now the washing up liquid - you need to do this VERY carefully
Next you have the water (again, extra care here!)
Now for the vegetable oil (keep using that spoon!)
Finally, the white spirt!
Good luck and enjoy!
This is a lovely little water density experiment. Great for fine motor skills too, with the pouring water and mixing. You will need; bicarbonate of soda, warm water, salt, sugar, fizzy water, and oil 6 jars/cups. Then 6 beads, 6 raisins, 6 leaves... you can use as many items as you find interesting.
If you don't have the resources to do these all at once, you could easily do 2 or 3 at a time.
Pour water into 1 jar/cup so that it is half full. Then pour 4 more jars/cups so they are full with water (leaving about 2 inches minimum, at the top). In the last jar/cup, pour fizzy water.
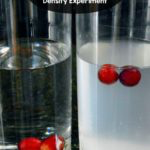
Now for the mixing. You will need to label each jar cup somehow so you know which is which.
Jar 1: Half water and half oil.
Jar 2: Fizzy water
Jar 3: water with as many tablespoons of salt as you can dissolve (we stopped at 6)
Jar 4: water with as many tablespoons of sugar as you can dissolve (we stopped at 6)
Jar 5: plain water
Jar 6: water with as many tablespoons of bicarbonate of soda as you can dissolve (we stopped at 6)
You have a pile of items in front of each jar. Ask you child if you think they will sink or float (and why). Pop them in and watch - do they sink or float? Why do you think this is?
This activity has plenty of messy potential, so you might want to do it in the garden...! So much excitement in our house doing this again today!
You will need: Washing up liquid, paint (we used washable paint) or food colouring, cups, straws (or an old plastic bottle, an elastic band or some selotape and mesh net - like one fruit comes in from the supermarket) and paper. We used white plain paper, but watercolor paper would be especially good if you have some handy.
Mix half a cup of water with a generous squirt of both washing up liquid and paint. If you have small people who might drink through the straws, I suggest you make the bubble bottle, below. All of the ingredients we used were non-toxic, but I’m sure that a mouthful of paint-and-soap-water wouldn’t be too much fun!
Make a bubble bottle. Cut the bottom off the bottle. Cut a square of the mesh net. Fix the mesh net onto the end of the bottle using an elastic band or some tape. Now you are ready to blow bubbles!
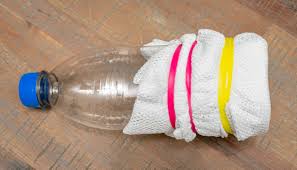
Let your children go crazy blowing mountains of coloured bubbles! If you're using a straw, then you need to blow the bubbles in the cup and place the paper on top. If you're using the bottle blower you can blow the straight onto the paper.
You get some great pictures! Enjoy!
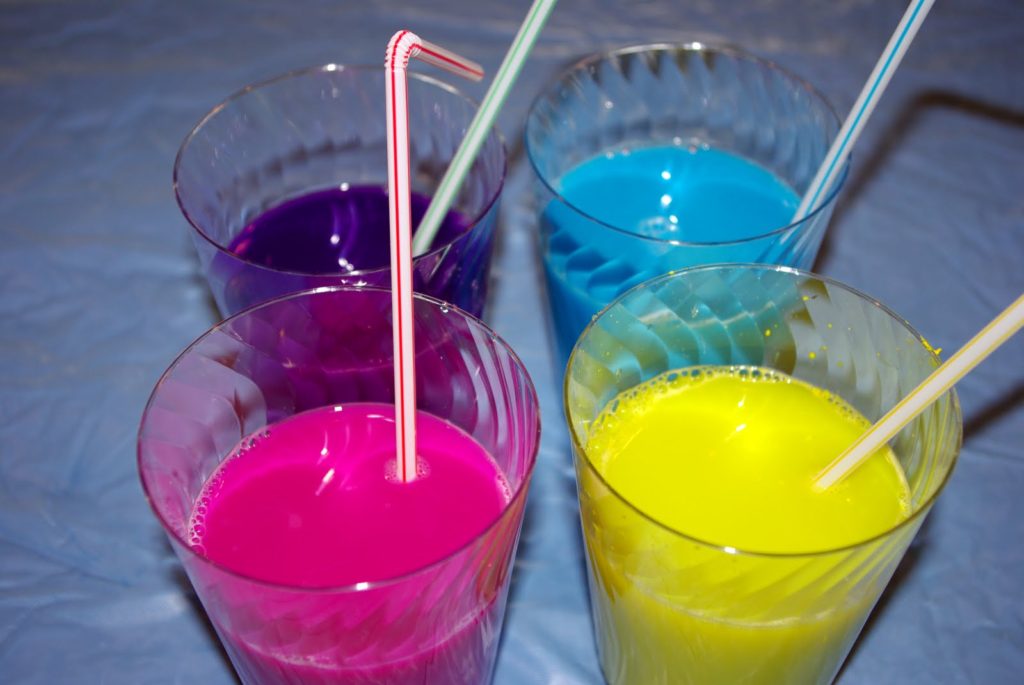
You will need: a bottle, some water, food colouring or paint, oil, aka seltzer (or a fizzing tablet - we find fizzing vitamins work well).
- Fill 3/4 of the bottle with vegetable oil.
- Mix the food colouring/paint with water.
- Fill the rest of the bottle with the coloured water.
- Break an alka-seltzer tablet into a few small pieces - we usually cut it into quarters (its a nice opportunity to talk abut whole, half and quarters), and drop them in the flask one at a time.
- Watch your lava lamp erupt into activity!
If you enjoyed this, you might also like our other activities; making a bug that walks on water, wax crayon and water art, making it rain in a jar, milk marbling and shadow drawing. You can find all 6 pages of activities here.
Continuing with our surface tension bug walking on water yesterday, there are a few different things that we can do for todays experiment. You will need: a needle (or pin), a bowl filled with water (its helpful if this is see through but not essential), a tissue/kitchen towel or cotton wool pad, some washing up liquid.

Place the bowl of water so the water is not moving. Drop the needle into the bowl of water. What happens?
Take the needle out of the water, and dry it. Place it on a piece of tissue/kitchen towel or cotton wool pad. Gently place it in the water. Wait for a minute and see if the kitchen towel/tissue/cotton wool pad sinks. If it doesn't, you need to gently push it with a stick or pencil. What happens?
Note: If this has worked, the needle/pin will be floating on the water.
The needle, like the bug, is nigh enough to be supported by the skin on the top of the water, as long as it does not pierce it.
Now, pick up the washing up liquid. Place a drop into the water - what happens to the pin?
Note: the pin will sink to the bottom, because the washing up liquid breaks up the skin of the water and the needle sinks.
If you enjoyed this, you might enjoy some of our other surface tension experiments: Bug walking on water, milk marbling, repelling water. Or take a look at the 6 pages of fun activities for you to do at home and in the garden!
- Fold a piece of thin card in half. Then, draw a bug shape with three legs and large feet. You need to make sure the top of the bug starts at the fold, so you can open it out like a greeting card. Tip: you can make your bug any shape or size, but the bigger the bug, the bigger the feet need to be.
- Cut neatly around the shape, being careful not to cut along the fold. Then, fold the bugs feet horizontally (outwards) so the shape stands up on the floor.
- Fill a dish with water and wait for the water to stop moving. Now, gently place the bug on top, so the bottom of all its feet touch the surface at once. Can you make it balance on the water? Tip: Make sure the feet sit flat.
- Now tape a coin on each side of the bug. What happens?
You might want to follow this up with this video about surface tension (Note, it is a pond skater eating another animal!). If you enjoyed this, you might enjoy our other surface tension experiment - milk marbling.
A fun, simple activity for the day today! Best done outside in the garden but can easily be done at home too!
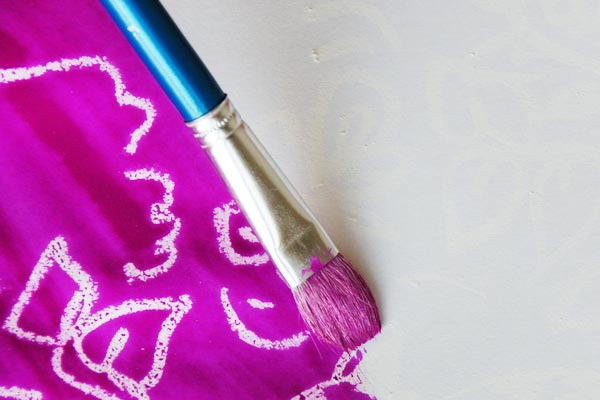
You will need: wax crayons, paint, water, a paint brush (quite large), a cup or jar
Using the wax crayons (light colours so you can't see them - like white) make it feel a bit more magical, create a pattern (relatively simple to start with - we drew a house and sunshine) on your paper. Now make a watery paint mix (roughly 1 tablespoon of paint to 1/2 a pint of water). Paint it over the picture and watch the watery paint roll off the wax. If you leave it to dry, the paint will leave a picture.
You might want to play about with the mix of paint. Slowly add more paint to the water - does it still work?
Enjoy!
Good morning! Following some feedback and requests from schools, we have decided to provide a PDF summary of the weeks activities, so you they are in one simple place with links provided.
We hope that it is useful! Please do feedback to us, we are always happy to hear how the activities are working for you (and any pictures are great!)
Todays PDF for weather can be found here.
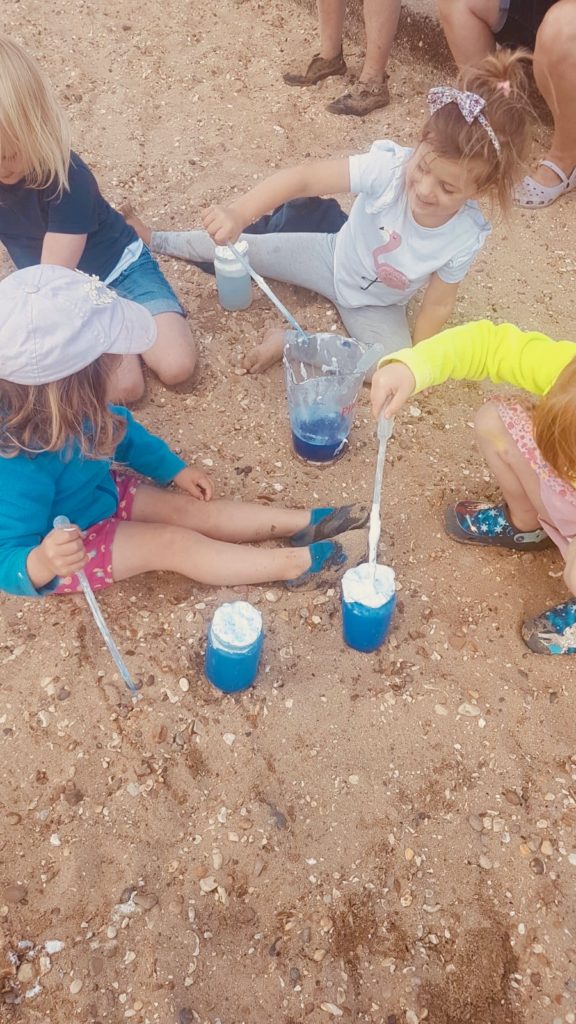
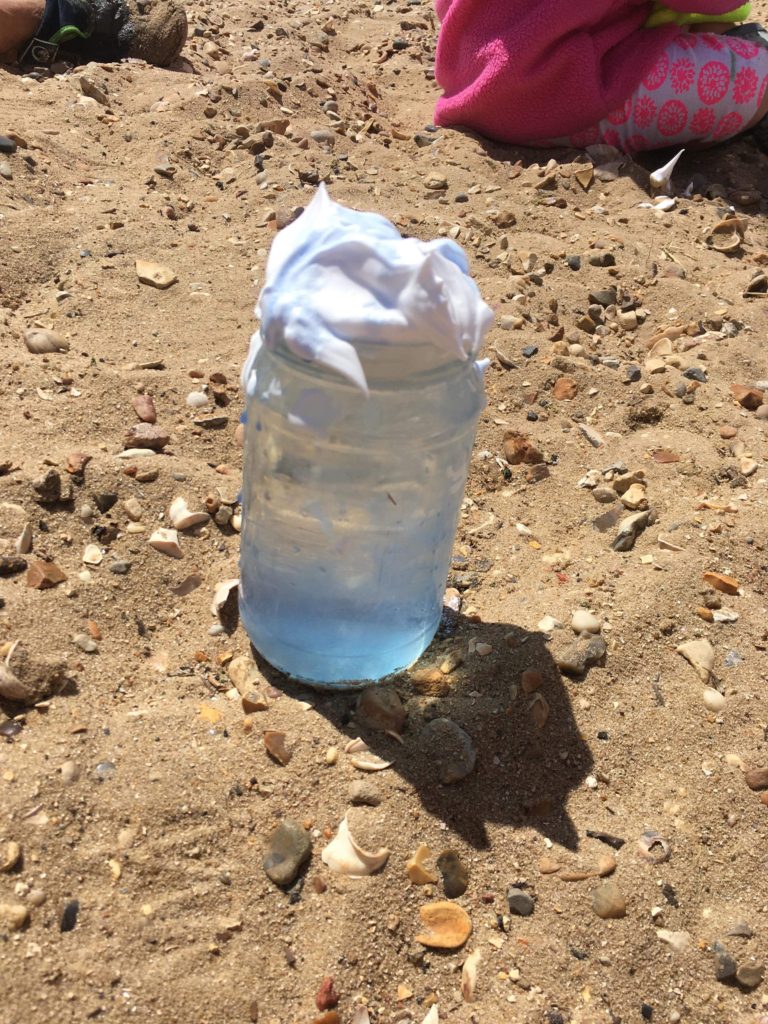
Good morning. It's a new week and we are going with a bit of a theme this week. Lots of learning about weather! So today, after all the rain for the past few days, we are making a raincloud.... in a jar. This is always a popular activity at the beach school sessions we run - we hope you enjoy it too.
You will need: some water in a jug (to pour), some food colouring (red, blue or green work best), something to gently drop water (a pipette, a water pistol, or the edge of a spoon), a clear jar, any type, some shaving foam (if you have gel, squeeze it out and rub it together to get foam. Squirty cream can work if you cannot get/do not have shaving foam.
Fill the glass jar roughly 2/3 full with clear water. Mix some of the remaining water with the food colouring, and practise making drops with your object. You need the drops to be added gently (if they are just poured directly you get a hole in the shaving foam, you want them to work their way through slowly). Can you add two or three drops at a time. Now you've practised, you're ready!
Empty the jar and refill 2/3 with clear water. Add shaving foam to fill the top - you will want about 4cm of shaving foam (to represent the clouds) on top of the water. Now, drop the coloured water slowly, bit by bit, on top of the shaving foam. Watch it make its way through. This will be the rain. Stop every 10 drops or so and watch to see if it is raining in the jar yet. It's great to see the rain start to appear as the cloud (the shaving foam) gets full of coloured water.
If you have a slightly older child, you might want to use this resource from BBC Bitesize, explaining the water cycle. It's aimed at KS2, but my 4 year old and 6 year old both watched it and understood some of it.
If you enjoyed this, you might also want to try our other weather experiments; making a rain gauge, creating rainbows, making a wind sock,
Good morning. A lovey hands on science and art activity today! It's great for smaller kids but actually in my experience, much older children also really enjoy it too.
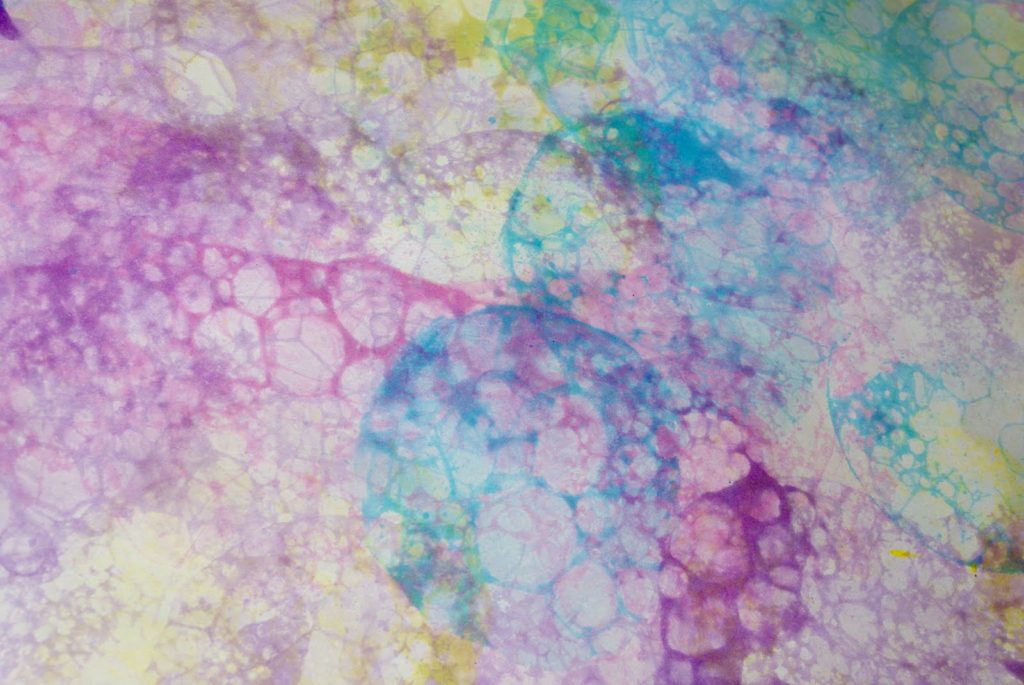
You will need: milk (any type!), a shallow tray, washing up liquid, a pipette or something to drip food colouring, 3 or more different food colourings, a cotton wool bud (or a paint brush would work well). If you want to make marbled paper you can use any paper to dip, but watercolour paper works amazingly well! If you do this, you will need a paper drying area set up too.
Cut your watercolor paper to a size that easily fits within your tray (we used small squares). Place the stack of paper near your tray because once you start to see swirling colours you need to use the paper quickly. Pour a thin layer of milk into the bottom of your tray. Using the pipette, add in a few (start with about 3) drops of food colouring scattered around the milk. Now for the fun bit!
Dip the end of the cotton wool bud into the washing up liquid. Tap the excess off the end and touch it into a dot of the food colouring, in the milk. The soap and food coloring will now start interacting with each other and the colours will swirl around. Little and often works best!
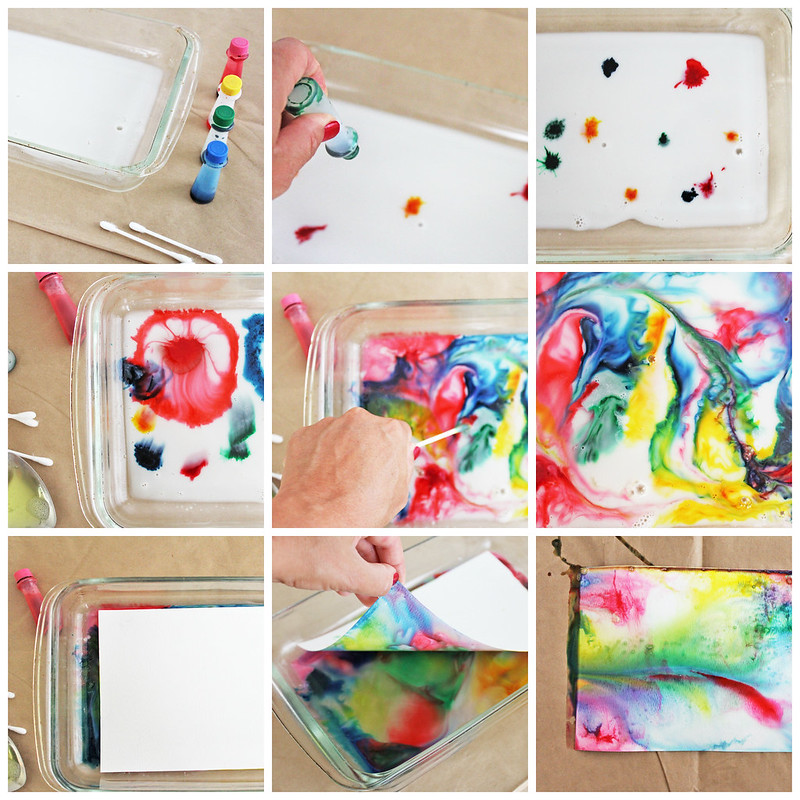
This is exciting enough on its own, but if you want to extend it, or you have older children, you can make marbled paper. To do this, before the colours get too mixed together take one sheet of your paper and lay it on top of the milk mixture. Press down. Gently lift it, set aside to dry, and continue with additional sheets.
Leave to dry completely. We were amazed with the results! Enjoy!
If you enjoyed this, you may also enjoy some of our Science activities: chromatography, salt patterns, the ice challenge or nature egg dying.