This morning we are having a bit of a maths focus outside. You will need: a piece of paper, a pen and something to lean on, for you activity in the garden or your daily walk. After this, you will need graph paper (ideally, but plain paper will do), colouring pens or pencils, a writing pencil and a ruler.
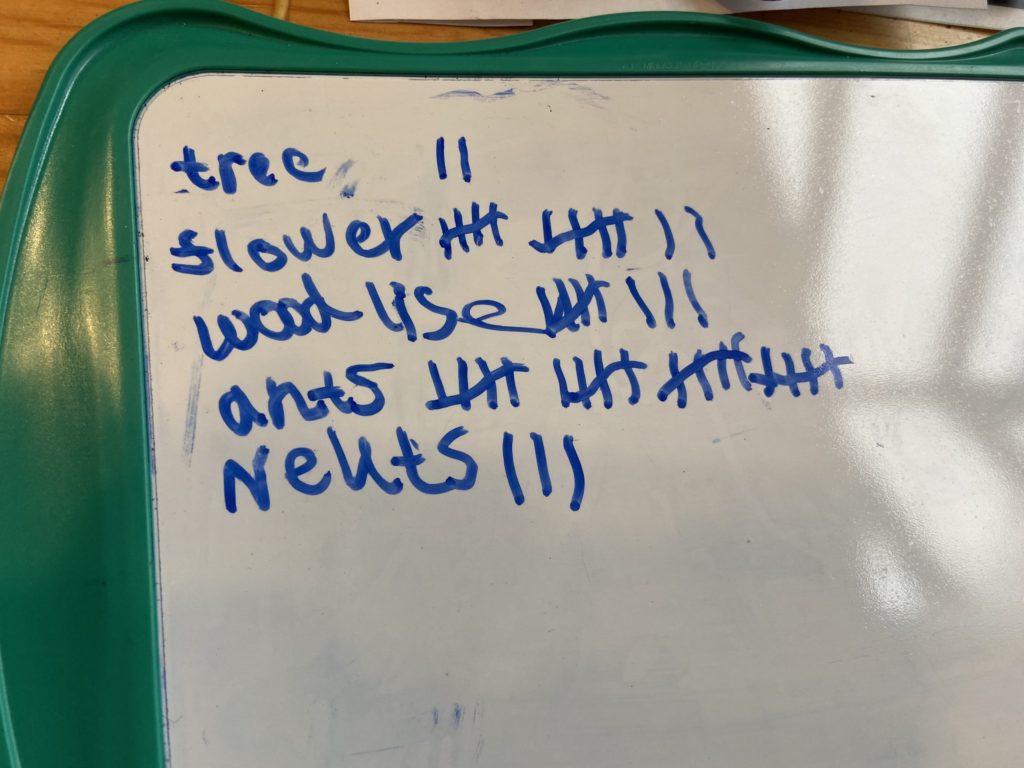
To start with you are going to do a survey. To do this, you write down your find, and then put a line next to it for each one. When you have completed a block of 4, the 5th line will go across the group (showing the group of 5).
You will need to explain how a tally chat will work and help at the beginning but older children should be able to manage this themselves. The children will probably see loads and want to include them all - thats ok, you might want to end the activity there but if you chose to carry on select 5 or 6 items to include in a bar graph later.
To complete a bar graph. Using the paper draw an axis. The horizontal axis (x) will be the items you spotted and the vertical axis (y) will be the number of the items you spotted. If you have graph paper, it's easy to write the numbers along the vertical axis, if you are using plain paper you will need to measure using the ruler and write a number up each centimetre (start at 0 on the bottom). For younger children parents might want to draw the axis first.
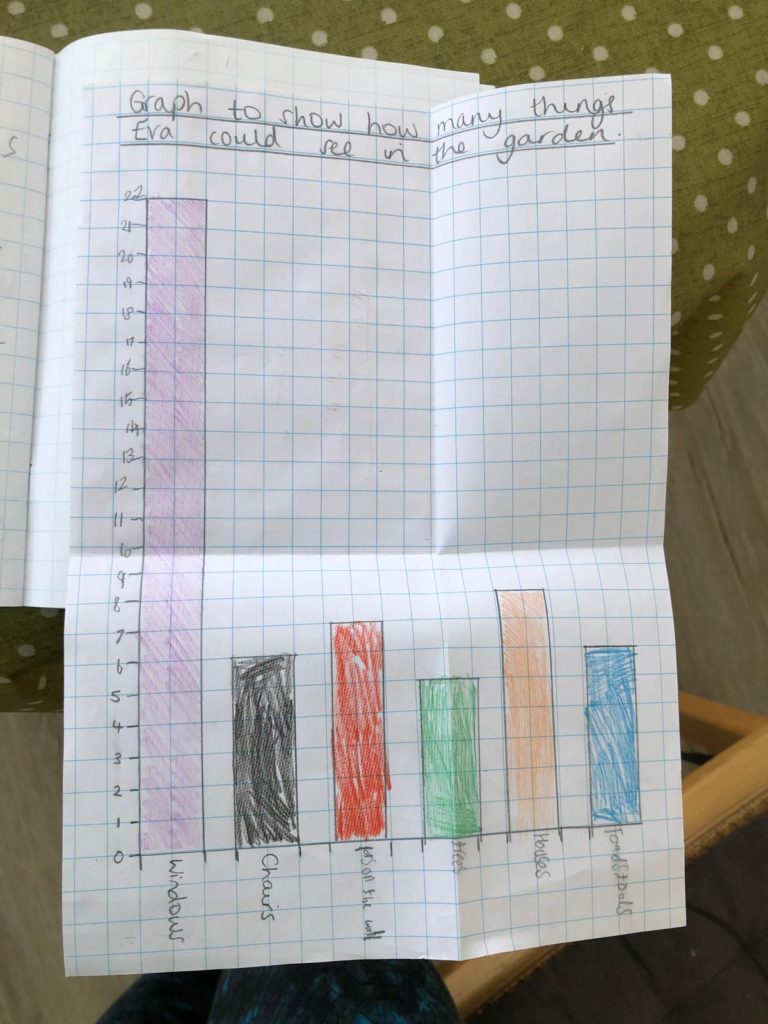
Now you draw a line for each bar on the graph to show the number of items you spotted, and you can colour them in different colours to make it easier to see. Some great maths for a nice outdoor activity!
Keep hold of it, because we will do another one mid summer!
Hopefully you saw the pre planning for this activity yesterday. Otherwise, you will need to do some freezing before you can complete this activity... its worth it though, it's good one!
You will need: A bowl, some paint or food colouring, water.
Mix the water and colouring together. Add it to the bowl and freeze.
Next you will need: salt (plenty) and water. A pipette is useful, but not essential.
Take the frozen coloured water out of the freezer. Turn it out of the bowl, so you just have the ice. Pop it into the garden or onto a tray (it's going to melt!). Ask your child(ren) to rub salt onto the top of the ice block. Use the pipette to ad small amounts of water to help the salt melt the ice. If you don't have a pippette, wet hands and rub water over the ice. Now leave for a few minutes (if its a hot day, 5 minutes will be fine, for a cold day, 15 is ideal).
Revisit the ice. Hold the block up to the sky/sunshine. What can you see?
Note: you should see the salt has made tunnels/ravines in the ice. You might want to discuss how/why this happened (salt lowers the freezing temperature of the water, so melts the ice).
This is a favourite for the children I work with, even the older ones!
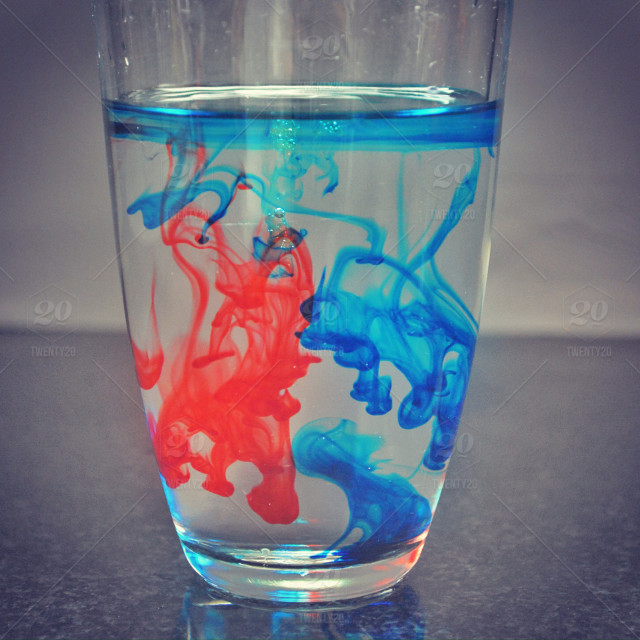
You will need: 3 colours of water (ideally yellow, red and blue). The easiest way to do this is to use food colouring and water and mix them together, but paint and water works just as well. 6 cups (3 with the water colours in and 3 empty). A jug of water. A pipette or old medicine syringe is helpful but not essential.
Pour some plain water into a cup (preferably see through). Use the syringe/pippette to add one of the colours into the water. Now add another colour. Mix them with a stick. What colour do they make?
It is a good idea to start simply and mix:
Yellow and red
Red and Blue
Blue and Yellow
Once the children have the idea, they can play about and see how many colours they can make! It's useful to talk about primary colours and why they are the basis for all other colours... if you're not sure, there is a video here.
You will need:
A large tray (or washing up bowl), some water, grass, flowers or mud! An old white or cream t-shirt/vest/top. Some string. A saucepan, some salt (1/4 cup). A hammer or food processor.
Cut 3 long pieces of string. Screw your top into a ball and use the 3 pieces of string to tie it up. Tie it as tightly as you can.
Pop your top into a saucepan and cover with water. Now add 1/4 cup of salt (or vinegar) and simmer on a low heat for 1 hour. You might ask a grown up to keep an eye on it for you so that you can get on with the other tasks!
Now collect some flowers (or raid the cupboards!). We have some suggestions:
Blue: Grape hyacinths
Yellow: Dandelions and/or daffodils (or tumeric)
Red: Lavender or avocado skins
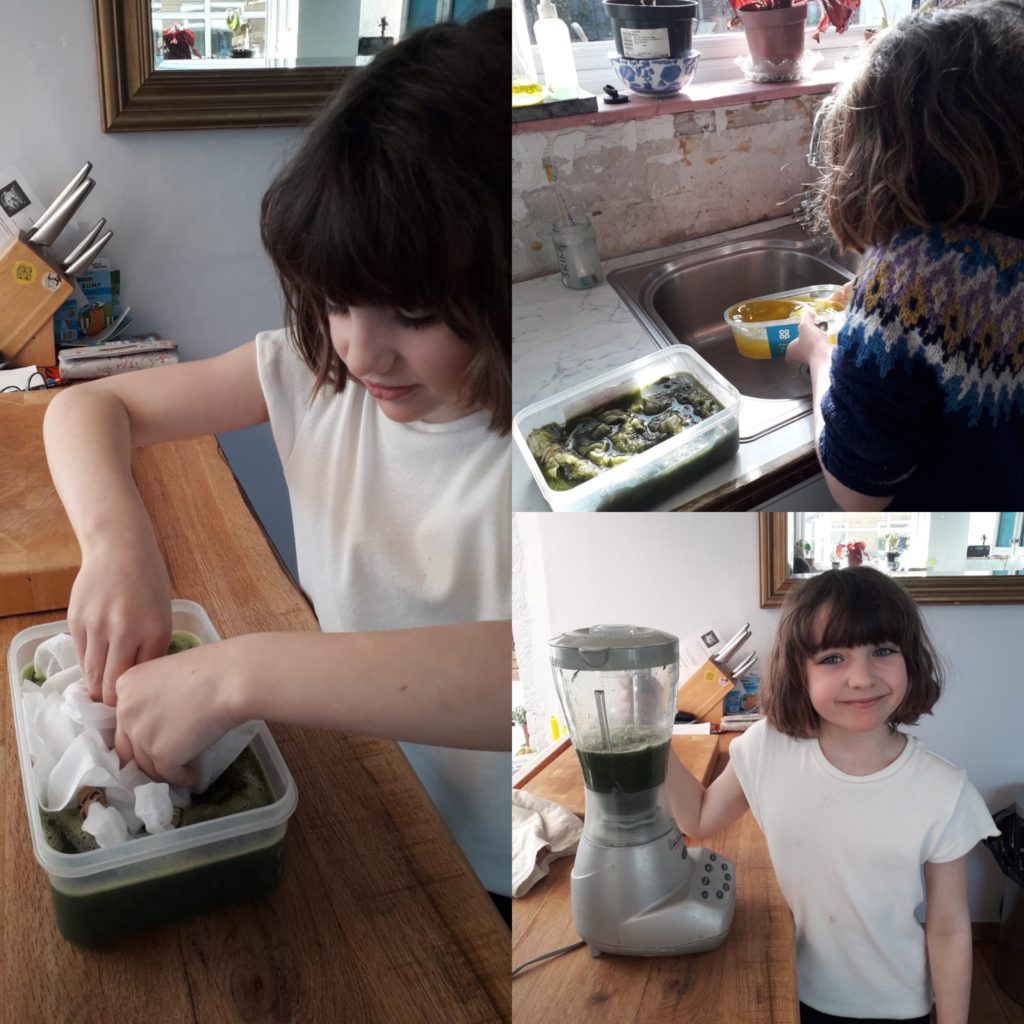
Green: grass, spinach or green seaweed
Grey: Blackberries
Put your finds into a bowl (you need to try to have the bowl at least 1/3 full) and then bash with a hammer (or pop into a food processor). Cover with water (about double the amount of the flowers/fruit/finds) in a saucepan and boil for about 40 mins (just enough time to have a good play!).
Now you've done the hard work and its time for the good part! Pop the flower liquid into a bowl (outside is better as it will cool down faster!). Take out the top from the other saucepan and rinse it under cold water. The ring it out. Take it to the bowl outside and give it a good stir. Then leave overnight.
Take it out and leave to dry in the sunshine (or you can ask a grown up to dry it on a plate in the microwave for 2 mins and then pop it over the top of a towel on a radiator).