Dummy text
Add your own marker
Add your own marker
Add your own marker
Add your own marker
The map ID you have entered does not exist. Please enter a map ID that exists.
We have written some activities for you to use on world ocean day.We hope you enjoy them. There are some for the classroom, so that can be completed in the classroom or at home and some to do on the beach. Please do email us at hello@timeandtidebell.org with any pictures you are happy to share, or feedback!
To use the PDF, just click on the picture below to download it and then click on the links for more detail about/instructions to complete the activities.
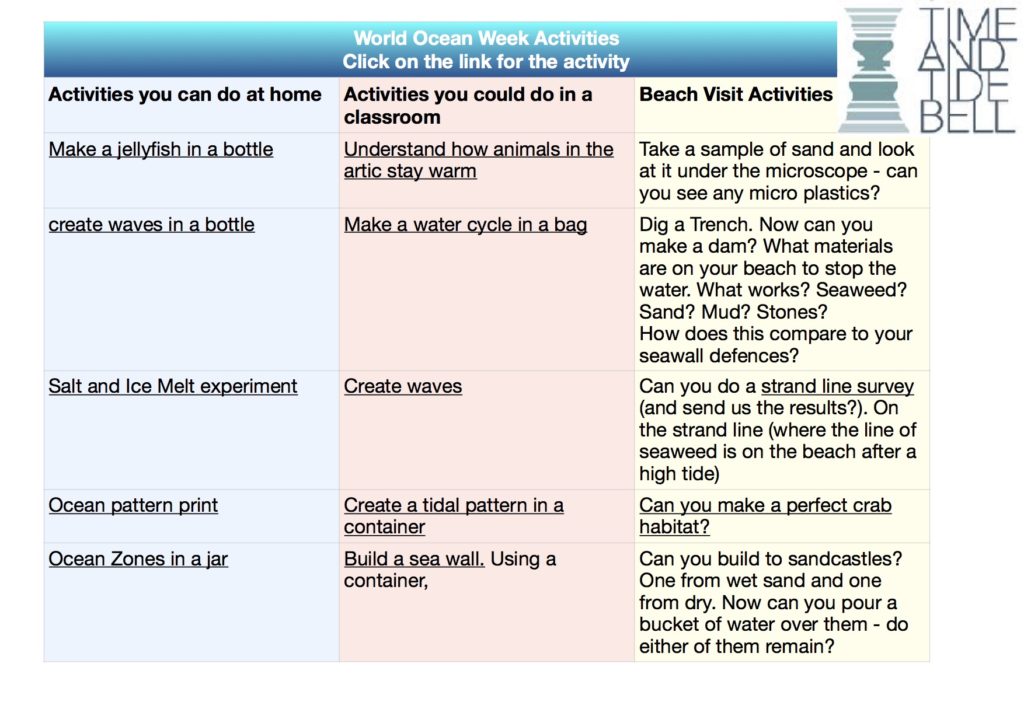
Enjoy!
Essex wildlife trust have some amazing activities that are just fab for the end of the holidays. If you have been to the beach at all, we really recommend that you visit their page and have a look.
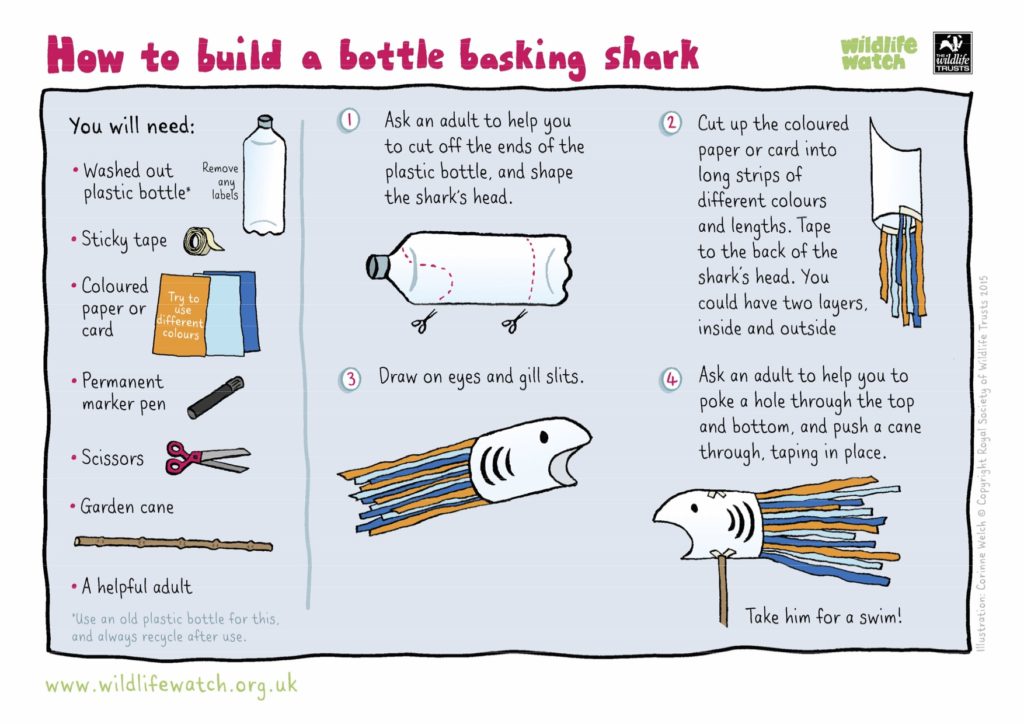
One of our favourites is this bottle basking shark but you can also go rock pooling, head on a beach clean (make sure you wear gloves!), plan some eco crabbing and try out some of these ideas to keep the sea healthy (can be done away from the sea). We hope you enjoy them as much as we have!
Inspired by Patrick a Arkham’s book, ‘Wild Child’ there is a free family activity pack for you to download here. A great holiday resource, enjoy!
This is a great little experiment! You'll see the sound making the grains of rice move and jump so much! You will need: A big bowl, cling film, uncooked grains of rice (or rainbow sprinkles), a metal pan and a metal spoon.
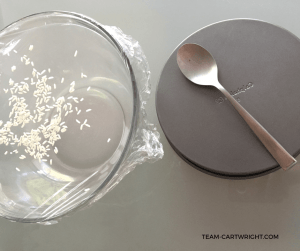
Pull the cling film tightly over the bowl. (One piece, as tight as you can get it, without it breaking.) Put about 1 teaspoon of rice (or sprinkles) on the plastic. Hold the metal pan close to the bowl (without touching) and have your child hit it with the spoon - the harder they hit it the better. The rice will dance!
What is happening?
The pan vibrates, creating a sound wave. This wave is transmitted through the air and causes the plastic wrap to start vibrating as well, making the rice dance! You are seeing the result of the sound waves in the rice.
Are any patterns formed? Try hitting the pan harder and then more gently. How does the behavior of the rice change? See if your child can hit the pan hard enough to bounce the rice right off the plastic! Enjoy!
This week we are going to do a bit of a sound focus. For today, that means making panpipes. You will need: 7 drinking straws (as wide as possible), scissors, a ruler, some tape.
Take 7 straws. Leave the first straw full length. Use the ruler to measure 2 cm on the next straw and cut it there. Pop the cut piece to one side to use later, and then move to the next straw. Measure 4 cm from the end of the third and then cut there, and continue in 2 cm increases until all the straws are cut. Arrange the straws in a line, using the cut pieces as spacers.
Wrap a length of tape around the straws and spacers to hold them in place. You might want to pop a lolly stick along the tape and tape a second time if you have a younger child (it makes them easier to hold!).
Lift the panpipes to your lips and blow the longest straw. Can you make a sound? What sound does it make? Now try the others - what do you notice?
Very simple but rather fun for a friday. Through out the holidays, every friday we will post up a mini science activity for your children to enjoy!
You will need: some cups (you can use empty food tins if you want but be careful of sharp edges!), a sharp pencil or pen (or something to make a hole in the tins), some string, scissors.
Take a cup, and put the pencil through the bottom in the middle to make a hole. Then repeat wth the second cup. Thread the end of the string through the hole in cup 1 and tie a chunky knot. You want to tie it so that the know is inside the cup. measure out the string so you have it long enough (we made it 4 metres long but you can do it however works for you/your space). Then repeat the low tying process (thread the string through the cup and tie a knot inside the cup, in the bottom).
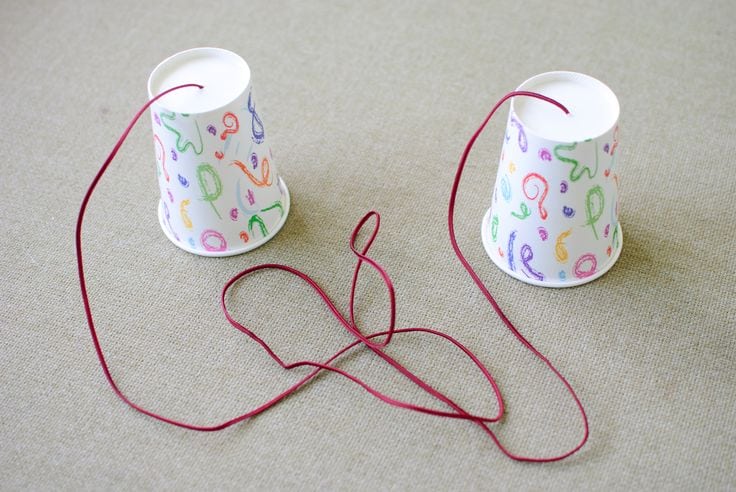
Now play! We had looked up some jokes to tell and whispered them into the cups.. "What is grey and wibble wobbles, wibble wobbles?" "I don't know" "A jellyphant!"
"what do you call a dinosaur that is sleeping?" "I don't know." "A dint-snore!" etc!
The sound waves travel down the string so you can hear! My children were AMAZED it worked and had a lot of fun with it all day. Enjoy!
You will need: a jar, some boiling water, string, a spoon, salt, patience!
Stir salt into boiling hot water until no more salt will dissolve (crystals start to appear at the bottom of the container). Be sure the water is as close to boiling as possible. Carefully pour the solution into your jar. (putting a spoon into the jar before adding the water should prevent the jar breaking. Suspend your string into the jar from the spoon laid across the top of the jar. Leave your jar somewhere it will not be disturbed and wait for your crystal to grow!
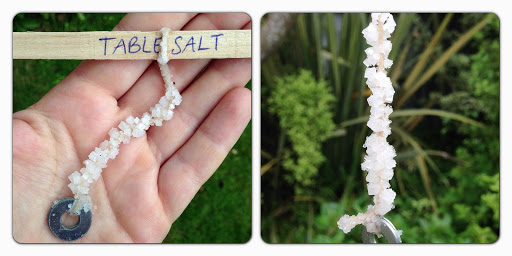
Once your crystals have grown, you can look for some interesting things in them:
- Any impurities in the salt or the water will change the shape and colour of the crystals you grow. What shape and colour are yours?
- Try using different types of table salt – try iodized salt, un-iodized salt, sea salt, or even salt substitutes. Is any difference in the appearance of the crystals?
- Try using different types of water, such as tap water compared with distilled water. Is there any difference in the appearance of the crystals?
Good morning! Today is the big butterfly count! It's a great little activity and you and your child(ren) will be taking part in a wonderful citizen science project. You need to download the spotting chart or get the free app and then sit somewhere for 15 minutes and record all the butterflies you see. If you live near a salt marsh, its lovely to do a comparison between the ones you spot in a garden or wild space and the ones you see down on the marshes.
Some butterfly facts for you (and some information about why this is important!):
The UK has 59 species of butterflies – 57 resident species of butterflies and two regular migrants – the Painted Lady and Clouded Yellow.
Five species of butterfly have become extinct in the last 150 years. These are the Mazarine Blue, Large Tortoiseshell, Black-veined White, Large Copper and Large Blue. (Large Blue was successfully reintroduced in 1992)
The State of the UK’s Butterflies 2015 report found that 76% of the UK’s resident and regular migrant butterflies declined in abundance, occurrence or both over the last four decades.
The Bumblebee Conservation Trust have been working on a way to help you identify bumble bees. Its a nice activity in a woodland or in your garden... we were really surprised at how many different types you can spot!
You can work through the online quiz to identify a bumblebee here.
You can use the spotter guide to identify a bumblebee here.
There are some top tips to help you here.
Good luck! We hope you find as many as we did!
Depending on how many of these you make, you might need to repeat this a few times - we made two colours each time, by splitting the mix in half.
You will need: vinegar, and ice cube tray, food colouring, 1 cup of baking soda. 1/4 cup of water, 1 tsp of clear gelatine.
Mix the powdered gelatine and baking soda together. If you are making two colours, split the water in two containers. Now mix the food colouring with the water (if you use gel food colourings its much easier to use warm water - but make sure it has cooled before you do the next steps!). Once the colour mix is ready, add the baking soda and gelatine powder and give it a good mix. Pop the mix into an ice cube tray and freeze over night.
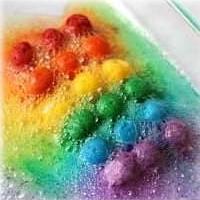
Once you have made all the colours you want, pop them into a tray and pour a little vinegar on top (using a pipette or old call syringe makes sure qualities don't get out of control and is also great for fine motor skills! Enjoy!
This is a great little activity and works if you like by mudflats (for lug worms and rag worms) as well as worms in your garden. Just replace the soil and sand with seaside sand and mud!
You will need: An empty jar (larger the better), 1/4 cup of gravel per jar, dirt, sand, leaves and grass clippings, a little water, a little water and a few worms...
Make the jar nice and damp (we will filled it with water, then tipped it out again). Pop the gravel in the bottom of the jar to give you a small base. Then, pop a layer of soil (at least 2 cm deep) in. Add a layer of sand on top (again, 2 cm deep). Now alternate with layers of dirt and sand. (about 2cm each layer). Once you are near the top, make sure the last layer of dirt is double the thickness to give the worms room to start. Add 2 table spoons of water into the jar so it it nice and damp.
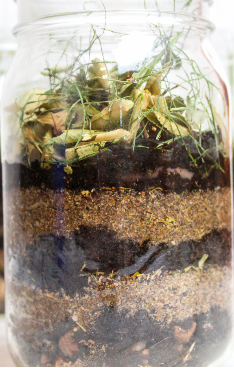
Finally, pop the worms into the top, and sprinkle the grass cuttings and leaves over the top. Then set somewhere to let the worms get digging. We put ours into a cardboard box as we found the worms are more lively when its dark, but this is not essential. Revisit every now and again and see if your layers have moved!
Don't forget, if you keep them for more than 24 hours then you need to keep making sure the soil is damp. Keep popping a tablespoon of water in each day. After 5 days (max) the worms will need some outdoor space so make sure you set them free in the garden and then you can do it all over again!
A perfect day for a new type of animal hunt! You will need: an empty, large drinks bottle (1 litre fizzy drink bottle tape shape), some soil you can collect, a light (torch or a phone light will do).
Cut the bottle 1/3 down from the top. Turn it over so that the spout is pointing downwards into the bottle.
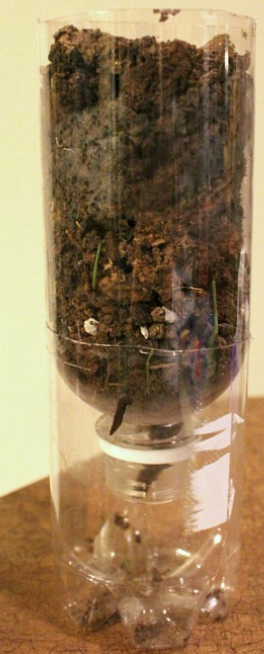
Now its easy - collect the soil, and pop it into the top of the bottle, until it is full (but not spilling over). Now, shine a light on the top of the soil, keep it there and watch.. you will start to see the bugs heading down to escape the light (and the heat). What bugs do you see?
You might want to repeat this a few times - we made a hole and gradually dug down to see what we could find. This is also a great experiment for sea mud and sand.... Try it on the beach and see what different bugs you discover!
Good morning. WWF UK posted a fab common insect and invertebrate species in the UK. It's a great little activity. Use the poster to have a hunt around your garden - what can you see? We found many of them (including a GIANT slug!) and then my older child tried to draw an anatomically correct earwig.
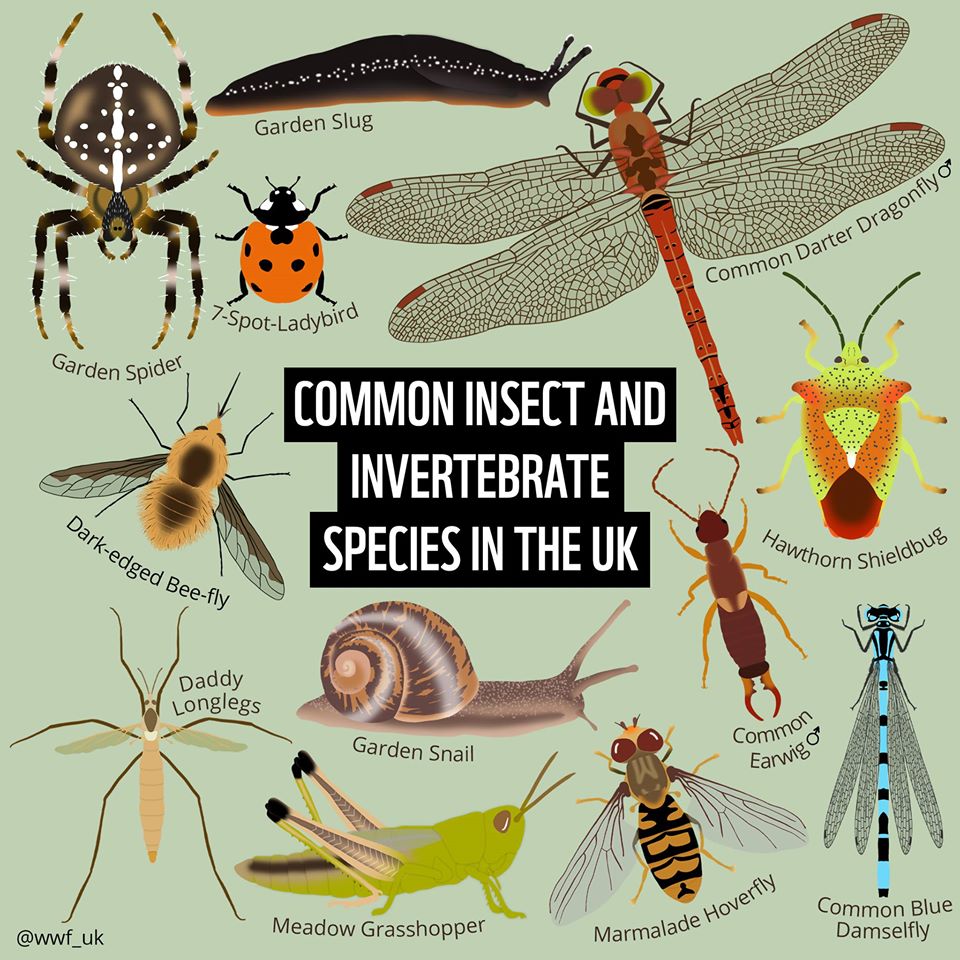
You might want to see how many you can find and then do a tally chart and (KS1) a bar chart or (KS2) a scatter chart. Some guides here.
You will need: a paper plate (or some strong card), some scissors, tissue paper or sticky back plastic, pressed flowers, a hole punch (or something to make a hole) and some string.
Firstly, you need to collect the flowers. Carefully pick some beautiful flowers (ideally ones that are relatively flat already, but any will do. Once you are home, get 2 pieces of kitchen towel. Place the flowers carefully front down onto the first piece and cover with the second. Now place the heavy books (or book and heavy objects on top). Now for a bit of patience! You need to leave them for at least an hour, ideally overnight! Once they are flattened, you can dry them in the microwave. Place them on a plate and pop in for 10 second bursts until they feel like dry paper. If you don't have a microwave, you might want to leave them to dry naturally. This takes between 1-2 weeks during hot weather.
Whilst the flowers are drying, you can start preparing your sun catcher. Take your paper plate (or cardboard). gently fold in half and cut into the middle - you need to cut around the middle, leaving about 5 cm thickness for the edge of the 'window'.

Once the window is cut out, your child can decorate round the edges. Now cut the tissue paper or stick back plastic so that it overlap the edge of the paper plate when it is stuck on. Make a hole in the top and tie some string in so you will be able to hang it.
When the flowers are pressed, stick the tissue paper/sticky back plastic onto the paper plate/cardboard shape. Place them in the pattern you want over the sticky back plastic/tissue paper) and stick them down.
Hang up and enjoy! If you likes this, you might also like our flower bookmarks, flower tea lights, leaf maths and Hapa zone flower bunting.