Another beautiful day here, this week is flower week so you may want to pick and press a few more flowers than just the ones for their activity. If you want them to last for a long time, you need to either dry them in the microwave or leave them for at least a week (details below).
You will need: a few small pressed flowers, some card (my children like sparkly card, but ay card will do!), glue, kitchen towel, heavy books (or 1 book and something heavy to go on top). If you have a laminator or sticky back plastic you might also like to use this as it keeps it protected, but it is not necessary.
Turn the card portrait (tall, not wide). Measure 5 cm from the top on both ends. Now cut a straight line between the two ends.
Collect some flowers. Flowers that are already a bit flat, or that will flatten well work best. As they dry, they fade so bright colours are often good too.

Once you are home, get 2 pieces of kitchen towel. Place the flowers carefully front down onto the first piece and cover with the second. Now place the heavy books (or book and heavy objects on top). Now for a bit of patience! You need to leave them for at least an hour, ideally overnight! Once they are flattened, you can dry them in the microwave. Place them on a plate and pop in for 10 second bursts until they feel like dry paper. If you don't have a microwave, you might want to leave them to dry naturally. This takes between 1-2 weeks during hot weather.
Once the flowers are dry, you can create a beautiful pattern on the card and then stick them on. If you have sticky back plastic or a laminator, you might want to use them to stop any peeling, but this is not vital.
Note: this week is flower week here. You might want to pick more flowers than you need and press them, so you have lots ready for all the activities. If you enjoyed this, you might also like our pressed flower lanterns.
Very simple but pretty activity today... and it involves more sticks. You will need: 7 sticks, 1 longer and 6 roughly the same size, rainbow paint (or just 6 different colours of paint) and twine/string. You might want some 'modge podge' or clear varnish if you want it to last!
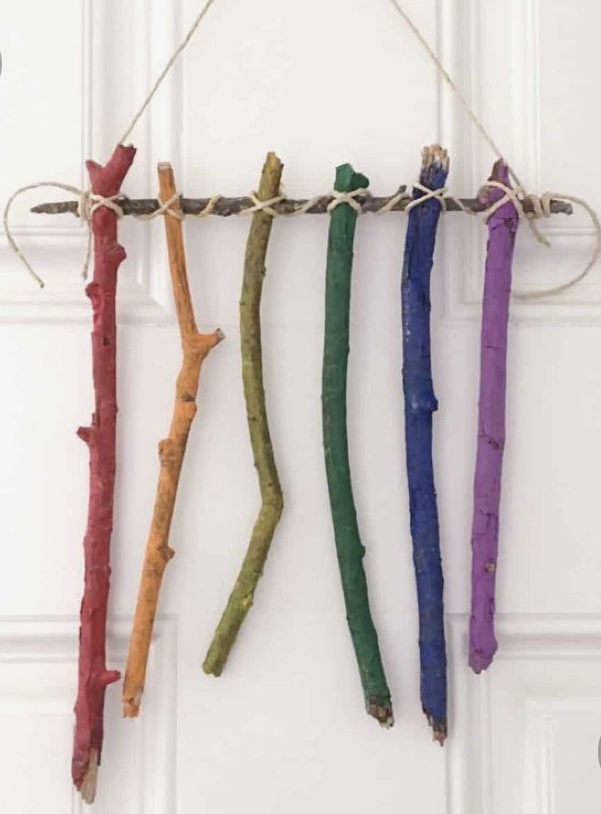
Collect your sticks. If you need to, give them a quick wash and leave to dry. Now, paint 6 of the sticks a different colour. Allow to dry. If you want the paint to last, this is when you need to spray/coat wth clear varnish or modge podge.
Using the twine, tie the painted sticks onto the unpainted stick. I do this one at a time, twisting the string under the plain stick, over the painted stick until is it secure (the picture should show you - you end up with a cross on each side of the stick). Once your sticks are secure, you tie another piece of twine/string on each end of the plain stick so it can hang up.
Hang up and admire! Enjoy...
We are doing the 30 days wild for the Wildlife trusts. Today, they have a fantastic wildlife bingo you can take part in. It's available to download here. And is a lot of fun.
A journey stick is a real fun way of being able to recount a journey or adventure. It is not only great fun, but its a start to story telling. For younger ones, telling the story of a journey. For older ones, using the objects they find to describe their adventure with a richness they might otherwise find hard.
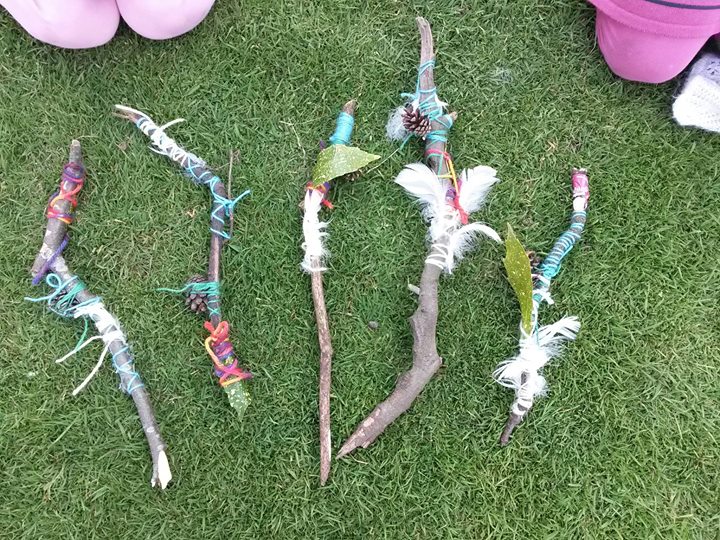
You will need: a stick, a few elastic bands or string (note if your child is younger it might be helpful to have different colours). You may want some paper for afterwards.
Step 1. Select your stick. My children really enjoy finding the 'perfect' stick for their adventure. It really doesn't matter what type of stick as long as its not too flimsy. My children really enjoy using an old potato peeler to whittle the end of their stick and then write their name on it but this is not necessary, just fun).
Step 2. Pop the elastic bands or string around it, so they are tight-ish (you're going to tuck objects you've found underneath).
Note: I usually take a few extra elastic bands so if we find more than we expected we can add them on.
Step 3: Head out on your walk. As you are walking, collect the most interesting things you find and attach them to your stick. You put them in chronological order (so start at one end and fill it along the stick). Anything of interest - one of my children loves collecting flowers. The other often finds all sorts of bits and pieces - interesting leaves, a bottle top, a flower, another stick, a feather etc.
The stick serves as a memory prompt, so being able to play, climb and find new places along the way is important.
You might want a pause once you're home, but at some point you can use the stick to re-tell the story. What did you do, what adventures did you have? If you have an older child, they might want to write up their experiences and create a magical 'wild' story. Smaller children might like to create a play or just tell the story in their own way.
There are lots of different ways you can play with this at the end. For my children, it often becomes mother natures wand...after being a spade, a space stick, a magic animal wand etc but they all find different ways to play with it.
Enjoy!
It's the wildlife trusts 30 days wild in June. Its a beautiful day here (hope it is by you too) so we thought Bows and Arrows would be a fun activity.
You will need: tape, a bit if string/twine, some sticks. You might also want some feathers.
Head into your garden or on a walk to collect sticks and feathers. Your stick for your bow is the most important one. It needs to be long - from your wrist to your shoulder. And ideally you want it a little bendy (or it will snap). It's quite fun selecting the best stick. Then you need to collect your arrow sticks. they need to be smaller than the bow stick, as straight as possible and less bendy.
Once you're home, you can make your bow. Take your long bendy stick and wind your twine around the top. Then tie it tightly. Now you will need to ask someone else to help you. Place one end on the ground and gently press the top so the stick is bent. Now ask the other person to hold it for you, whilst you tie the twine onto the other end (keeping it bent). If you've done this correctly, the stick should remain bent and the twine should be tight.
Now, you might want to use the tape to secure a feather or pattern on the end of each bow (remember not to make it too heavy). You can also decorate your bow and arrow.
Its ready to be played with. It can take some time to learn how to use it, so you will need to be resilient (a great learning skill!). You hold the bow, put the end of the stick with the feather attached against the string, and pull it back. When you let go, the arrow should spring forwards.
Enjoy!
Good morning. Its world Ocean day today... one of my favourite times of the year! This year, there are some fantastic activities all day, so join in! You can find everything here, at the world ocean day site. Theres something for all ages.
Enjoy!
You will need: a straw, a tray, some water, a piece of paper, some paint.
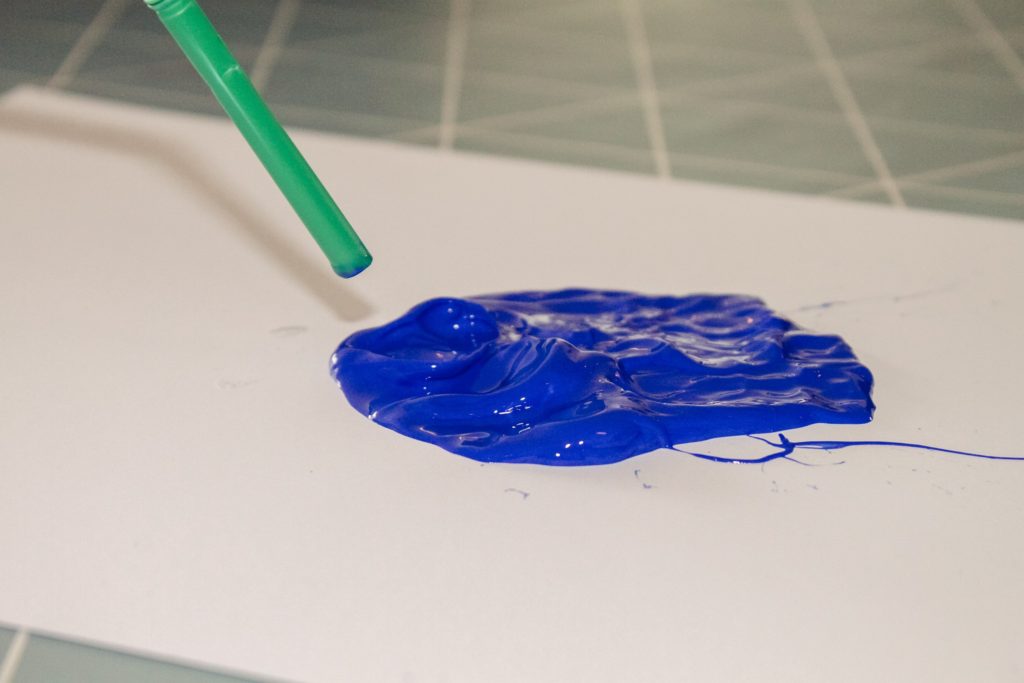
This is a really simple activity. Probably best done outside! Fill the tray with water. Then simps lean down at one end and blow through the straw, as near to the surface of the water as you can. What happens? You could see waves forming in front of the straw and moving across the tray.
Now you can repeat this with lots of different liquids. One of the most fun we found was popping a dollop of paint (around the size of a 2p coin) in different colours along the edge. The use the straw to blow the paint. Does it all go in a straight line or make wave ones? What happens right in front of the straw? What happens either side of the straw?
Enjoy!
You will need; Clear plastic bottle, water, oil, food colouring, a funnel, and hot glue if you want it not to leak! You can also include small toys/trinkets like googly eyes or beads to add to the wave bottle
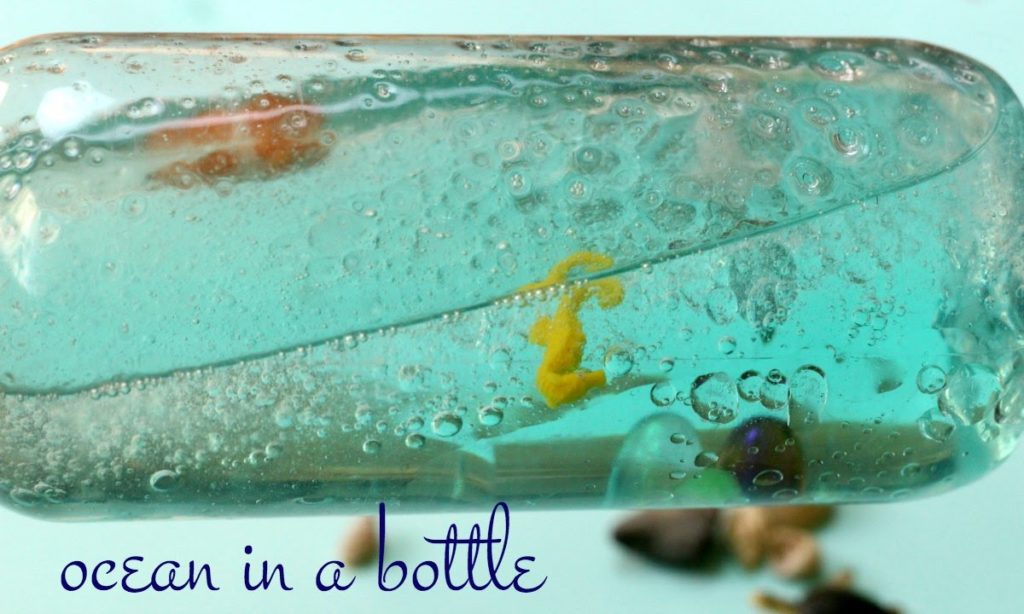
Place the funnel in the mouth of the bottle and let your child pour water into the bottle until it is 2/3 full. The exact amount of water isn't important, you just want to make sure that you have a good distribution of oil and water at the end. Add a few drops of food colouring to the water and swirl to mix.
Keep the funnel in place and pour the oil into the bottle. Keep pouring until the bottle is almost full. If you're adding decorations make sure you leave enough space so the bottle doesn't overflow. At this point, you can drop in any decorations that you want. Add beads, glitter, or any other small trinkets you'd like. You can pour the oil slowly or quickly. If you let the oil and water sit, they will separate over time.
Hold the bottle horizontally and gently tilt it up and down. As you tilt, watch the water make a wave in the oil. Enjoy!
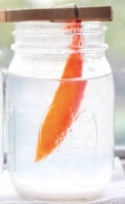
You will need: Empty water bottle, Plastic bag, Scissors, Thread, Water, Food colouring.
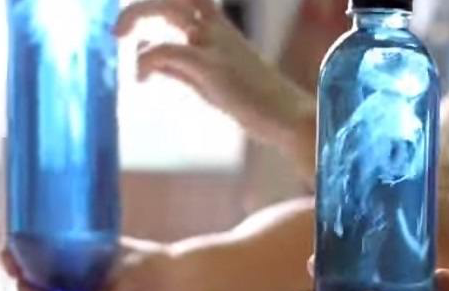
Fill the bottle with water and put a drop of food colouring in the water (this is not necessary but makes it easier to see the jellyfish.
Take the plastic bag and fold it flat. Cut a square of the plastic bag (roughy 10 cm edges). Take the center of the piece of t-shirt bag and make a bubble (it will be a bubble once you wrap some of the thread loosely around the area). Don’t make it too tight, you want to be able to add air to the bubble! Tie the thread.
Now, turn your jellyfish over; you should be able to see the hole leading to the centre of the bubble. Next cut the parts of the t-shirt bag, hanging down from the heading tentacles. You need to cut more away than you leave behind - we had 5 tentacles.
Turn the Jelly fish over and find the opening to the head. Blow into the opening to fill it with air. Add enough water so that the head is half filled with air and half filled with water. Twist the head tight. Stuff it and the tentacles into the water bottle and screw on the cap tight. Turn it up and down and watch the jellyfish swim from the bottom to the top.
Enjoy!
You will need: Large bowl, Ice Cubes, fat (we used lard, but butter would do!), 2 plastic bags, tape, you might also like to use Food Coloring.

Fill a bowl with ice and water. Add food colouring if you would like (we didn't, as we were inside and it gets everywhere!). Next ask your child to place their hand into the water. It’s cold! Why?
Now for the messy part! Fill one of the plastic bags with the lard/butter. Ask your child to place one hand in another bag. Then put their covered hand inside the blubber/fat filled bag. Seal the tops with tape so water can’t get into the bags.
Squeeze the fat around their hand, so it covers the hand completely - you want about 1 cm covering all the hand.
Next ask your child to place their hand into the water again. Is it still cold? Why? Why not?
Fun Fact: 4″ thickness of blubber keeps polar bears toasty warm. Can they think of any other animals that need to keep warm in cold countries. This is exactly how they do it!
You will need: two see-through cups, water, salt. Some food colouring. Pipette or medicine syringe. Some beads. Raisins, Anything else you fancy trying to float or sink.
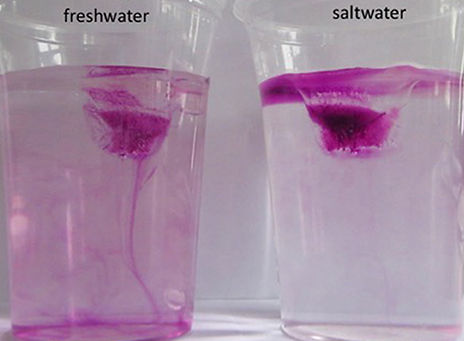
Pour an equal amount of warm water into the cups. Into one of the cups, mix salt - as much salt as you can dissolve. Now for the fun! Using a pipette or syringe, pour a tiny amount of food colouring into both the cups. What happens? The salt means that some things float!
Now try with other household items - beads, a cork, food.... see what sinks and what floats?
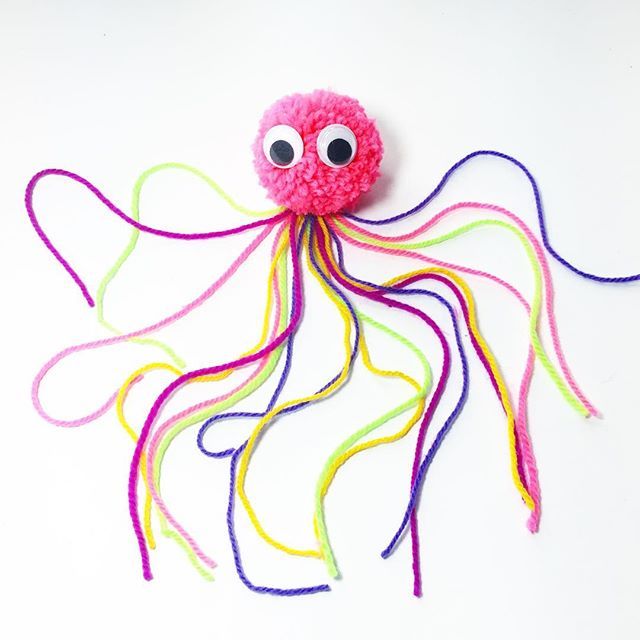
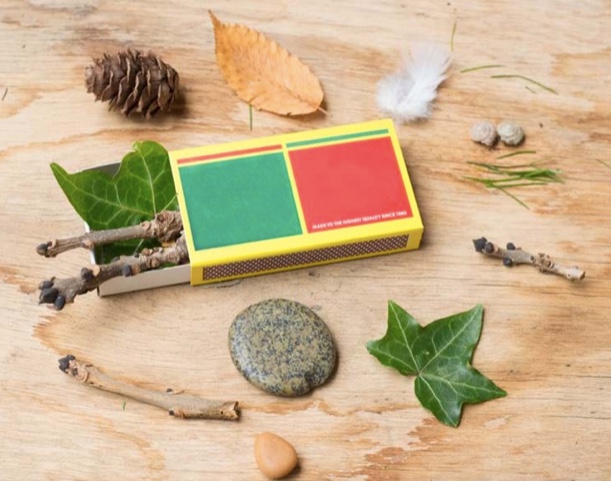
Making a Jellyfish Pompom. You will need: Scrap cardboard (quite strong), wool, scissors that will cut through thick wool, pom pom maker template (below), google eyes, a few pieces of extra wool.
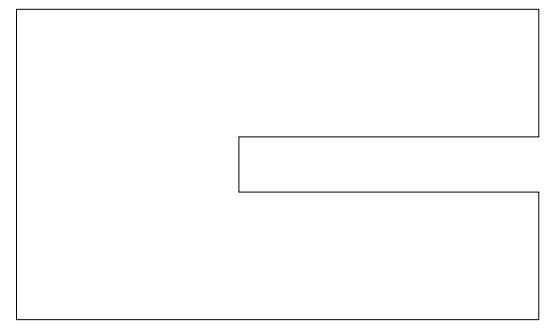
Cut out a shape that resembles a rectangle with a slit running down the middle but not all the way, like in the image above. Wrap these in wool - you will need a lot of layers! While the wool is wrapped around your cardboard pom pom maker tie it tightly in the middle. Now tie the smaller bits of cut off wool around and let them dangle down (they will be the tentacles).
Slide it off the end, turn it over and tie even tighter on the opposite side. Use your sharp scissors to cut the looped ends. It will come out looking very shaggy and a bit uneven. Now it just needs a good trim which is the big secret of making a fluffy, round pom pom.
This is a great fun game for at the beach or in the garden! It's a lot of fun! You will need; an old rectangular container (about the size of a small brick), some mud and/or sand, some water, some space to mix mud - an old washing up bowl or just a spot where you can pour water and mix, something to mix with - a stick, spoon, spade etc!
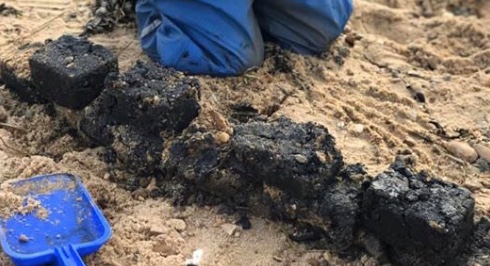
Start by mixing your mud, sand and water together. You want a nice wet mixture! Now, start to put it into the container, as if you are building a sandcastle. Turn it out and make the next one. Put the shapes in a line - we did 5. Now continue mixing and making, adding the next row on top. You want to place the brick over the join of the bricks below, to make your wall strong. Play around with the mixture - what is strongest? Wetter? Dryer? More mud? More sand?
We often leave the wall up and revisit it the following day to see if its still there, but you can also pour water over it and see it its strong enough to stay standing!
It's great, muddy fun. Enjoy!
Good morning. We hope you have a lovely week exploring our Oceans and Seas! For todays activity, you will need: a see-through bowl, some stones & paint & paint brushes (or some plastic rockpool animals), PVA glue/varnish or dodge dodge, some water.
Have think about what kinds of animals you find in your local rock pools. If you are unsure, you can watch our suggested video here.
Now using your paint and your paint brushes, paint the animals onto some stones - we painted a sea anemone, a starfish, a shore crab, a cuttlefish, a moon jellyfish, a blenny (fish) and a periwinkle (sea snail). Leave them to dry.
Once dry, paint over with the glue/varnish/modge dodge to stop them rubbing off in the water. Leave to dry again.
Now create your rockpool. Fill the bowl (about 1/2 full) with water. Pop in some other stones and the ones you painted. Then swish the stones around - can you spot all your animals without moving the stones around? Or are they hidden? You could add sand or mud if you'd like, so its more like a rockpool you see near you if you live near the beach.
Enjoy!
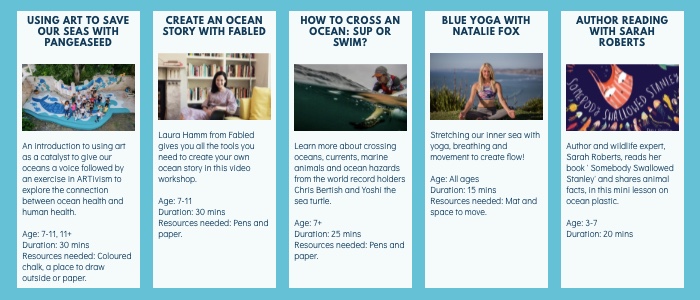
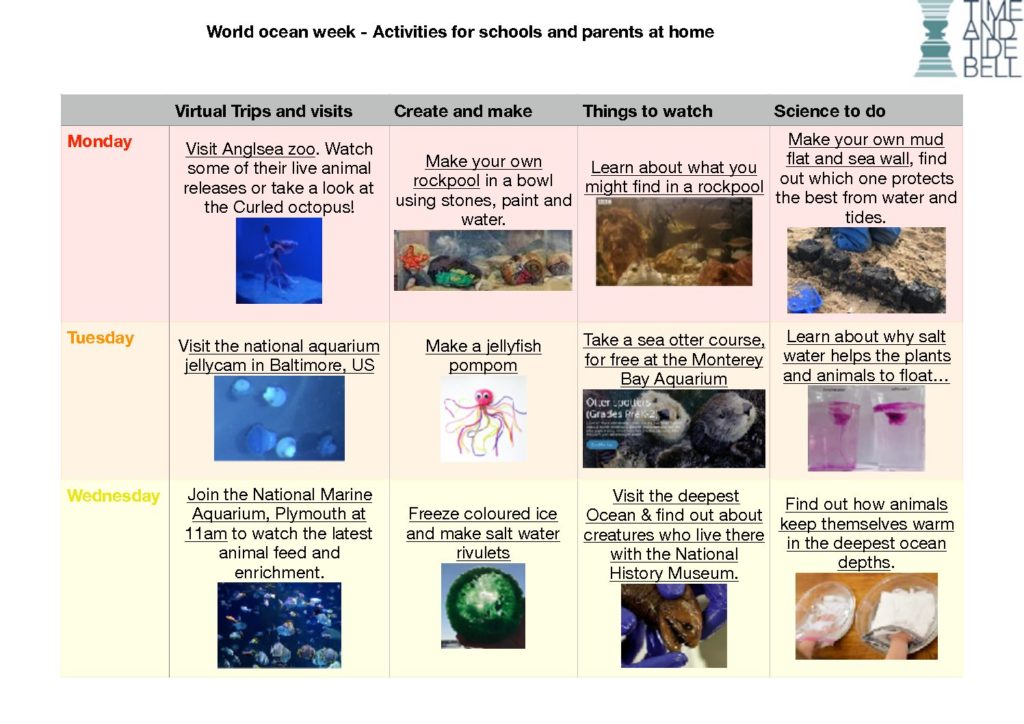
It's World Ocean Day on Monday 8th June. This week, we have produced a lot of activities that you can use every day to learn about our oceans. There are trips (virtual) to take, Science to do, things to create..... You need to download our PDF for the links to work. Click here to download.
Please send us any of your makes and creates - we will post them up on a special page! All to help build up to next Monday, where you can take part in the live activities as sessions here. Enjoy!
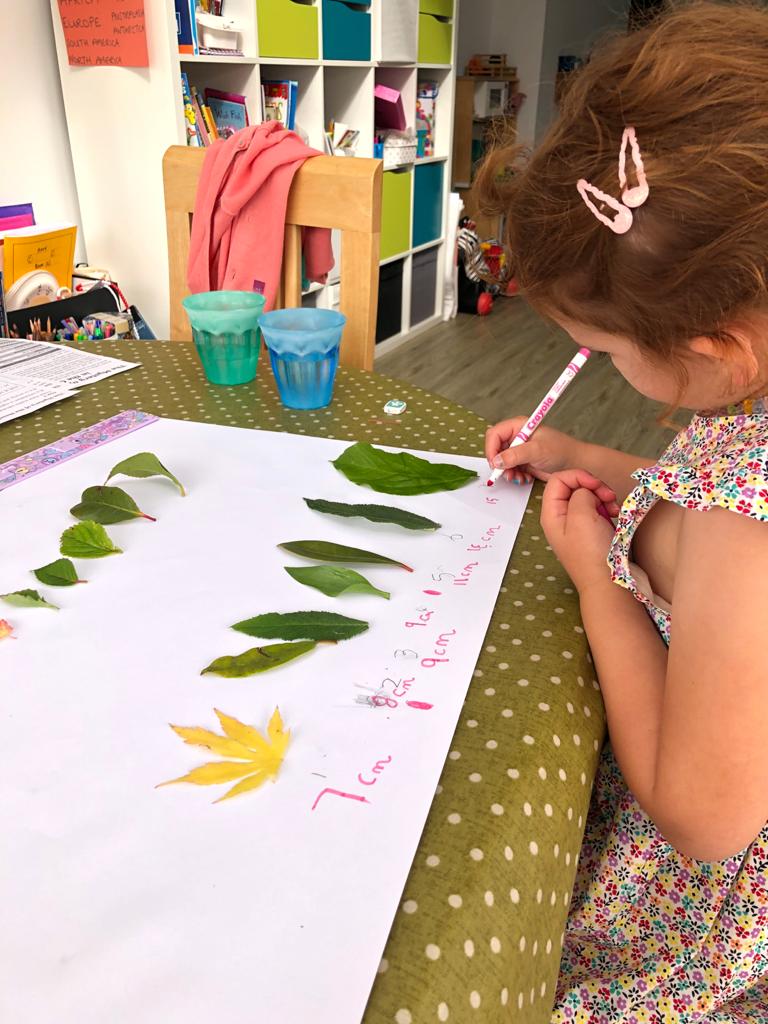
This is a lovely little activity focussing on a number of skills in a fun way.
You will need: a ruler, a pen (or chalk), leaves, paper or a patio.
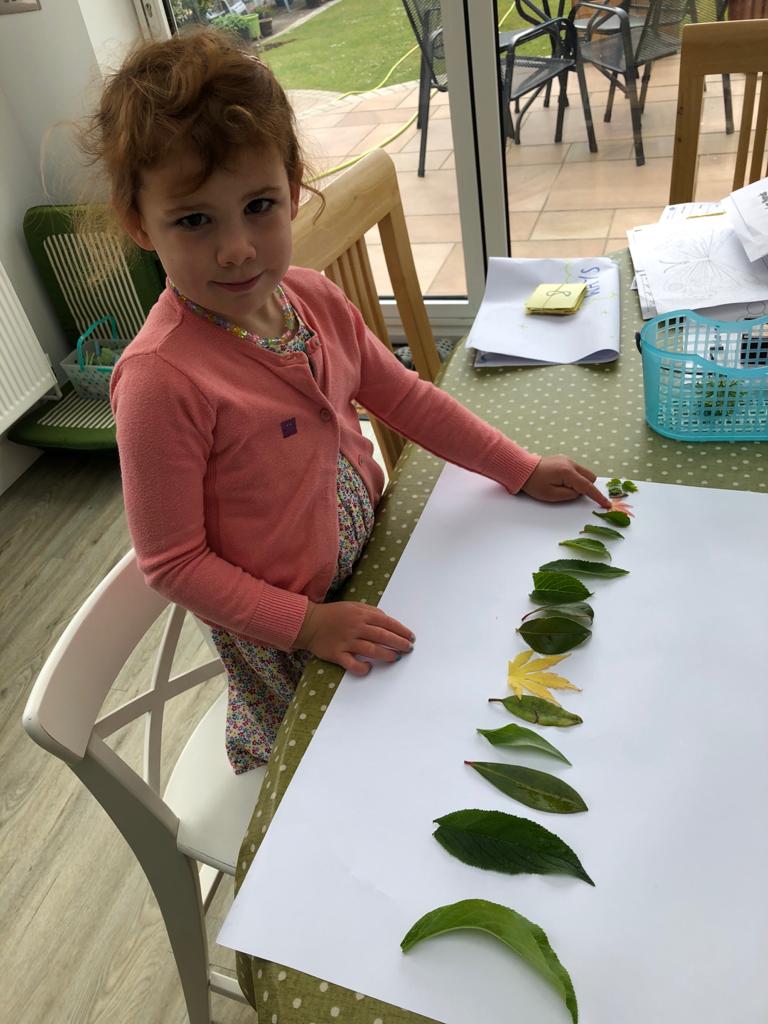
Go on a mini scavenger hunt around the garden. How many different leaf types can you find? If you are planning a walk or some exercise, then you might want to collect other leaves along the way.
On a piece of paper (or on a patio), place the leaves in size order. Then, using your ruler, measure the length of the leaf and write it below.
These make a beautiful gift for someone or look very pretty in your garden.
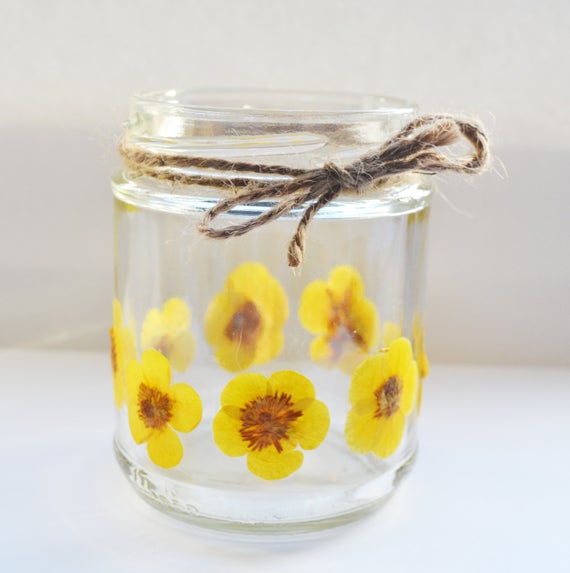
You will need: a jam jar, some flowers, a heavy book, some baking paper, some PVA glue, a small candle, PVA glue.
Collect some flowers from the garden. Take a piece of baking paper and fold it in half. Open up the paper, place the flowers face down, fold the paper over the top and then place the heavy book on top. Leave for at least 1 hour (ideally, longer). Check the flowers are flat.
If you have a microwave, place the flowers on the baking paper in the microwave and then heat in 10 second bursts until the flowers are dry (this will make the jars last a long time). If you don't, you can use the flowers before drying.
Using a paintbrush, dab some PVA glue on the inside of the jar. Stick the flowers onto the side with the glue. Then paint the PVA glue over the top. Leave to dry. Paint a second layer of PVA glue over the flowers to make sure they are protected from the rain/damp. Leave to dry again.
Now place a small tea light in the bottom of the jar and might up. The flowers look beautiful in the light and in the evening cast lovely shadows too.
Fancy doing a colour scavenger hunt - primary colours for small children and matching colour shades from a paint chart for bigger children? Or looking for signs of summer approaching next month? The Woodland Trust have some super activities here. We particularly liked the colours and the texture ones... Enjoy!
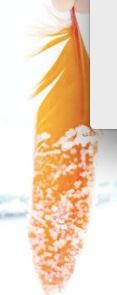
You will need: salt (quite a bit!), pegs (or something to hold the feathers up), a few feathers you have found during your outdoor exercise (or you get buy some online for craft projects), water, as many glasses or containers as you have feathers.
To begin, you need to boil the water. Whilst the water is boiling, stir in (a lot!) of salt. You need to keep stirring it in, until it will not dissolve anymore. This makes a supersaturated solution.
Pour the water into the container and use a peg to clip the feather in a suspend it in a jar. Wait for 3 days, and keep checking in! You will see the crystals begin to form. It looks beautiful!
You will need: Glass jam jars (with secure lids if you want to shake them), Jug of water, Vegetable oil, Dishwashing detergent, Food colouring, Small container (as many as you have colours - we used 3), Syringes or pipettes, Optional: Table salt
1. Pour water into your jar, until it is about 3/4 full.
2. Pour vegetable oil on top of the water to fill the rest of the jar (you need space to put on the lid).
3. Watch what happens. Does the oil mix with the water? Screw the lid onto the jar and shake it…. can you make the oil and water mix? For children learning about density this is a great time to ask, “Is the vegetable oil more or less dense than the water?”
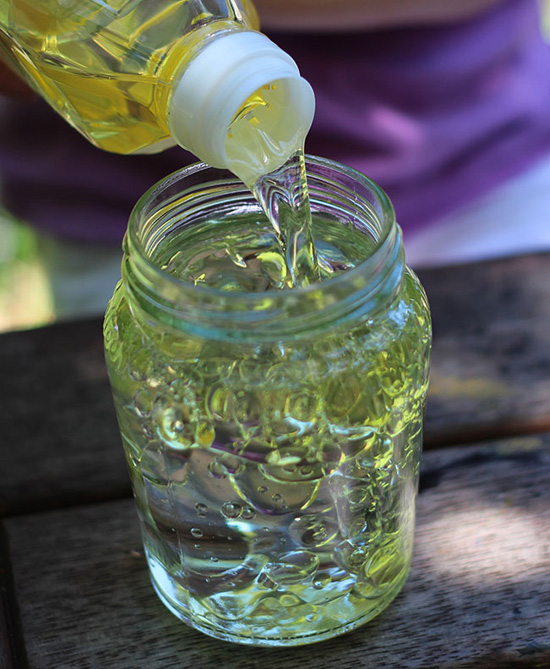
4. Mix a squirt of washing up liquid with some food colouring in a small container.
5. Using a dropper or a syringe squirt (a little at a time, great for fine motor skills) some of the coloured liquid into your jar with oil and water in.
6. Watch what happens….. you should see a lava lamp like affect with bubbles of colour falling through the mixture. Repeat this progress as many times as you like (we used different primary colours to practise colour mixing too - so blue and red, red and yellow etc)
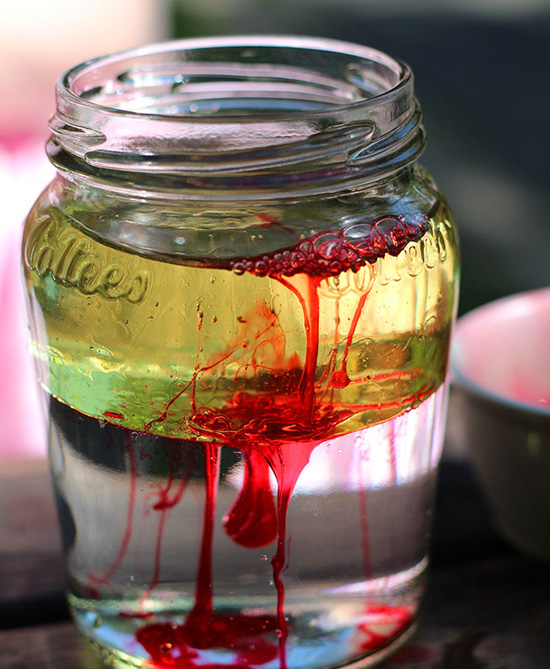
7. If you would like to see a different reaction try pouring a teaspoon of salt into the mixture and watch what happens.
Whats happening? There are a lot of interesting things to see. Firstly oil and water do not mix. Even if you shake the jar the oil will immediately separate from the water as soon as it settles. Oil is attracted to other oil so it sticks together. The same goes for water….. so they just don’t mix – they are immiscible.
Secondly, the oil always floats on top of the water because the oil has a lower density than water.
Detergent is different again. It is attracted to both water and oil. Detergent grabs onto both causing oil droplets to be suspended in the water. When you shake the jar the detergent molecules stick the water and oil together. That's why detergent is so handy for cleaning greasy dishes!