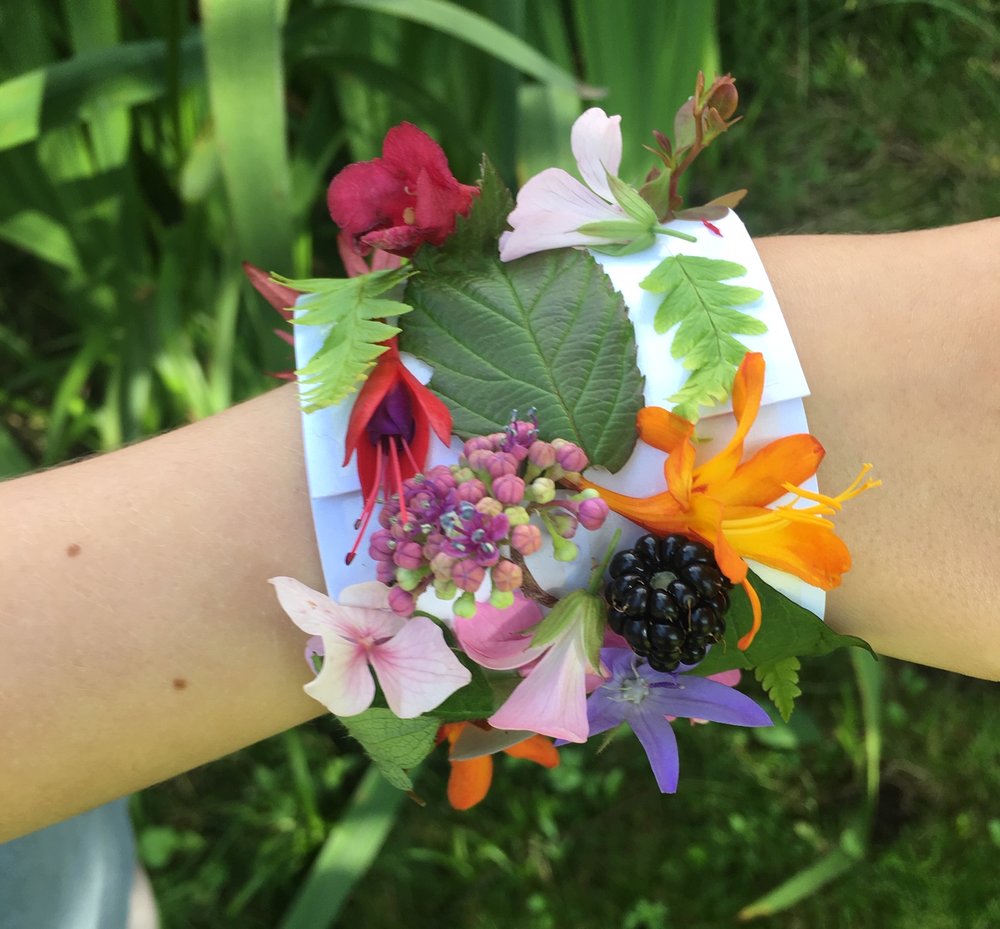
Good morning. We are big fans of mud and bloom boxes in this house. Todays activity is from their blog. It is a make your own nature bracelet. A lovely way to keep small (and big!) children entertained on a nature walk! Enjoy!
Depending on how many of these you make, you might need to repeat this a few times - we made two colours each time, by splitting the mix in half.
You will need: vinegar, and ice cube tray, food colouring, 1 cup of baking soda. 1/4 cup of water, 1 tsp of clear gelatine.
Mix the powdered gelatine and baking soda together. If you are making two colours, split the water in two containers. Now mix the food colouring with the water (if you use gel food colourings its much easier to use warm water - but make sure it has cooled before you do the next steps!). Once the colour mix is ready, add the baking soda and gelatine powder and give it a good mix. Pop the mix into an ice cube tray and freeze over night.
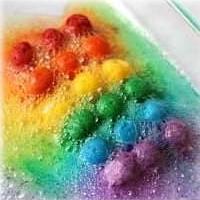
Once you have made all the colours you want, pop them into a tray and pour a little vinegar on top (using a pipette or old call syringe makes sure qualities don't get out of control and is also great for fine motor skills! Enjoy!
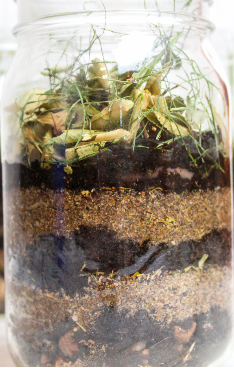
You will need: Clear jar (glass or plastic - we used the one from the experiment on monday), soil, spade, waterFind a place to scoop up some soil. Make sure it is okay to take the soil from this spot. {Don’t dig up your pretty flowers.} Choose a spot that will have various kinds of soil. Your garden probably isn’t the best location.
Find a place to dig up some soil. Choose a spot that will have various kinds of soil. Your garden might be ok, but you will need to take a spade of lots of different levels of soil - dig a deep hole! Its also great if you can go to a nearby field or a woodland - you will see different results. Fill your jar about half full with soil. Take the jar home ready for the experiment.
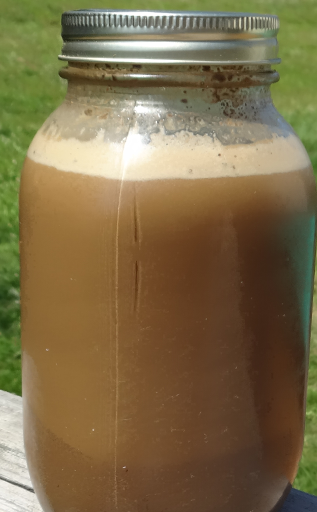
Once home, fill the rest of your jar up with water. If it has a lid, pop it on and shake hard. Ours didn't have a lid, so we did a lot of stirring with a stick to make our soil potion. Now leave it somewhere you can see it... it starts to separate slowly and it's interesting to revisit a few times. Ours took 24 hours to separate properly.
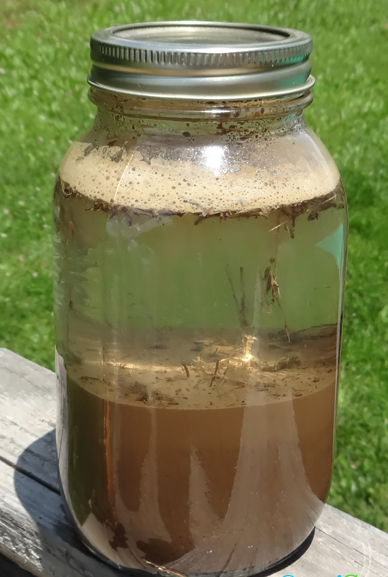
Things that you might want to note: The sediment will form layers in the jar. The largest (heaviest) sediment sink in the water first. As time goes on, more and more sediment sink in the water. At the bottom of the jar, you’ll see gravel (stones). Next, you’ll see sand, then silt, then clay, then rotting leaves/wood.
The types of sediment are named based on their particle size. The smaller (lighter) sediment are at the top of the jar. The amount of each type of sediment depends on what type of soil you have.
This is a great little activity and works if you like by mudflats (for lug worms and rag worms) as well as worms in your garden. Just replace the soil and sand with seaside sand and mud!
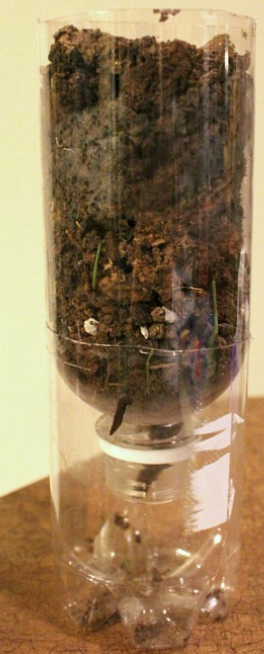
You will need: An empty jar (larger the better), 1/4 cup of gravel per jar, dirt, sand, leaves and grass clippings, a little water, a little water and a few worms...
Make the jar nice and damp (we will filled it with water, then tipped it out again). Pop the gravel in the bottom of the jar to give you a small base. Then, pop a layer of soil (at least 2 cm deep) in. Add a layer of sand on top (again, 2 cm deep). Now alternate with layers of dirt and sand. (about 2cm each layer). Once you are near the top, make sure the last layer of dirt is double the thickness to give the worms room to start. Add 2 table spoons of water into the jar so it it nice and damp.
Finally, pop the worms into the top, and sprinkle the grass cuttings and leaves over the top. Then set somewhere to let the worms get digging. We put ours into a cardboard box as we found the worms are more lively when its dark, but this is not essential. Revisit every now and again and see if your layers have moved!
Don't forget, if you keep them for more than 24 hours then you need to keep making sure the soil is damp. Keep popping a tablespoon of water in each day. After 5 days (max) the worms will need some outdoor space so make sure you set them free in the garden and then you can do it all over again!
A perfect day for a new type of animal hunt! You will need: an empty, large drinks bottle (1 litre fizzy drink bottle tape shape), some soil you can collect, a light (torch or a phone light will do).
Cut the bottle 1/3 down from the top. Turn it over so that the spout is pointing downwards into the bottle.
Now its easy - collect the soil, and pop it into the top of the bottle, until it is full (but not spilling over). Now, shine a light on the top of the soil, keep it there and watch.. you will start to see the bugs heading down to escape the light (and the heat). What bugs do you see?
You might want to repeat this a few times - we made a hole and gradually dug down to see what we could find. This is also a great experiment for sea mud and sand.... Try it on the beach and see what different bugs you discover!
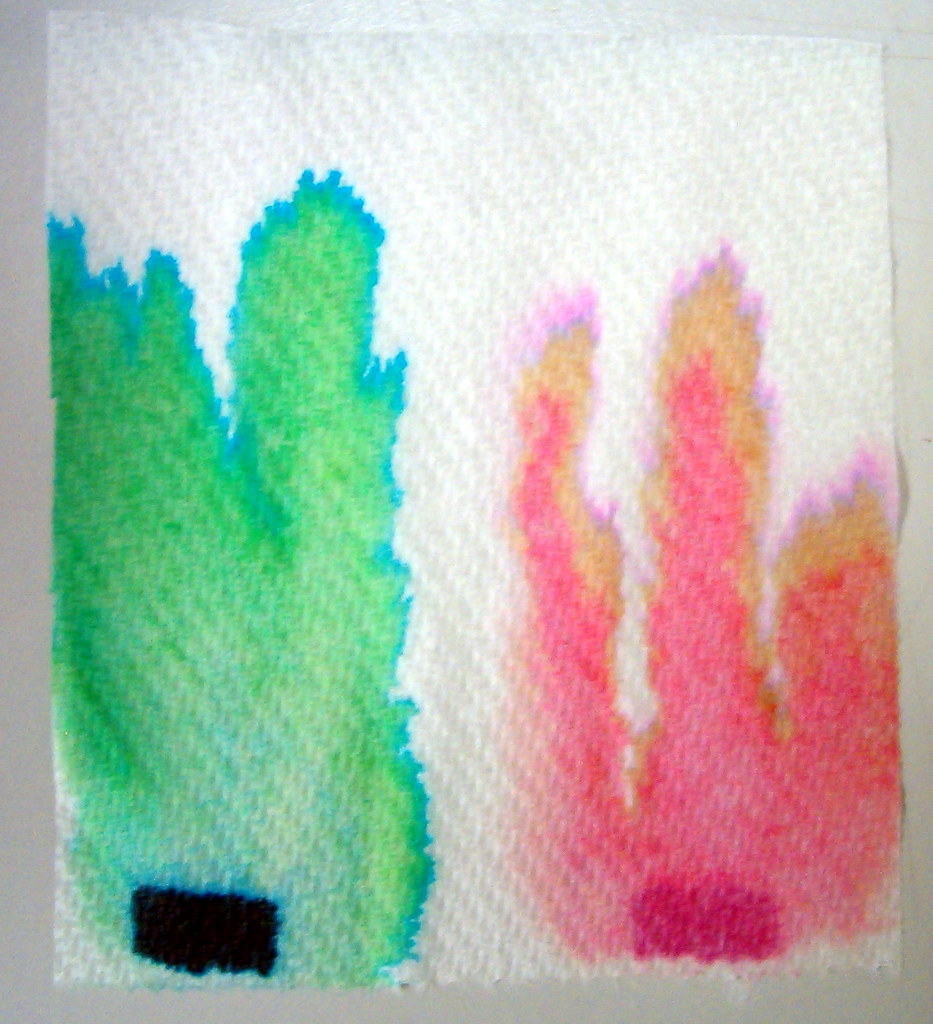
A lovely little experiment today that is nice to watch for a while... You will need: food colouring (or some kind of dye) in red, blue and yellow (the primary colours), 6 small cups/containers (they don't need to be the same shape, but don't make them too big because it will take too long!), some water, 6 kitchen towels and a jug for pouring.
Collect your 6 cups and place them in a circle. In the first cup put some red food colouring in, the second cup put some yellow and the fifth cup pop in some blue. Now pour water in each cup so they are roughly 2/3 full. Leave the cups in between empty.
Fold your paper kitchen towels into long thing strips. Now place each end into the cups (so one end goes into the colour cups and the other into the empty cup next to it (see photo below)
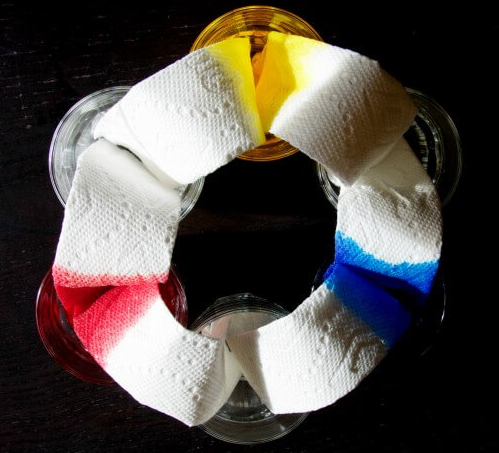
You can watch as the colour starts to move along the paper straight away and within around 1 minute, all the pieces of paper turn yellow, blue or red. This is a good chance to ask your child what will happen next. A few minutes later, you will see the water starting to drip into the empty cups and mixing to make orange, green or purple. After around 5 minutes, you should see the water level in the cups go down and the empty cups should have some coloured water in them. Leave it for a little while and the new mixed colours will start to move along the paper towels too. In 20 minutes all the water levels should be roughly equal and the colour mixing should be complete.

A bit of trouble shooting: if this is happening slowly you might want to double up on the paper towels so they draw more water (some brands work faster than others). You do need the glasses to be pretty full so another thing you could do is add more water to the primary colour cups.
Enjoy!
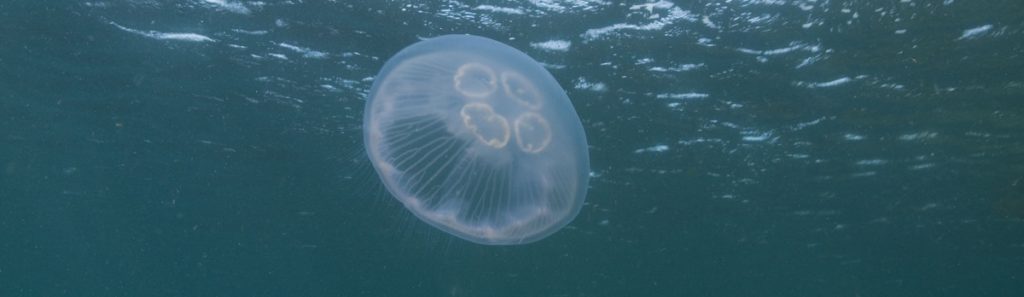
It's the start of Jellyfish Season..... so we thought we would post our Jellyfish spotting chart for you! See what you can find! You can download the chart here...
If you aren't by the sea, you might want to look at the Jellyfish cam at Monterey Bay Aquarium!
Thursday is still an activity you can do in the garden or in a house/flat. You will need: coffee filter paper or kitchen towels, scissors, a few different colours of felt tip pens (we suggest black, green, purple, red), some water in a bowl, a timer (or the ability to count to 60).
Cut the kitchen towel into large pieces (we used 6cm tall by 4cm wide, but any tallish rectangle is fine). On the bottom of the kitchen towel strip, measure 1 cm and make a mark. Now, just above the measurement, draw a block and colour it in with your pen colour. Add a small dot right on the to of the kitchen towel (so you know which colour you used). Repeat the process with each of the pen colours.
Now, get your dish of water. You will need to hold the kitchen towel so that when it is put in the water, the block of pen, does not go into the water - it should be just above it. Start the timer, and hold in the water for 60 seconds. Take out and set to one side to dry. Repeat with all the colours.
Now look, what do you see? You should have seen the pen colour split, so that you get an array of colours -these are the colours used to make the colour you started with. Which one had the most colours - black is usually our favourite, what did you discover?
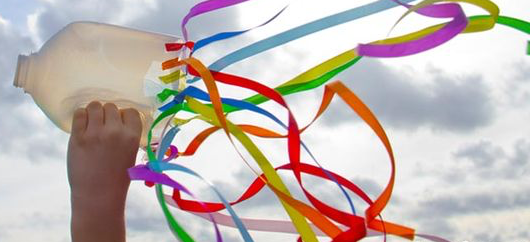
A bit more learning about wind today. This is nice and simple... a rainbow wind sock. This is great for little ones, but a nice independent activity for slightly older ones too. You will need: An old milk carton, some rainbow (or any colour you choose) tissue paper / paper coloured in / ribbon, some scissors, a hole punch is handy, but not essential.
Draw a line around the milk carton, under the handle. carefully use the scissors to cut the milk carton so that you have an edge. Make sure you take the lid of the bottle off - we want the wind to be able to blow through the bottle.
Now prepare your rainbow ends. Cut strips of tissue paper / ribbon / paper of roughly equal lengths (you want them quite long - we did ours roughly 30 cm long). Using a hole punch (or scissors) make regular holes around the base (the end you've just cut). We left 3 cm in between each one but it doesn't matter too much. Then tie on the paper. If you are struggling to cut the holes, you can, very easily stick them on with glue.
Take the handle of the wind indicator and hold it up outside in the wind. Can you make the paper stream in the same way? What about over your head? And can you make them move about in different directions? Try standing in different places in your garden to see what happens.
It's super windy across most of the UK today, so a nice activity to learn about wind direction and have fun too! You will need: two wooden skewers (straws will do - the stronger the better), scissors, some string, Sellotape.
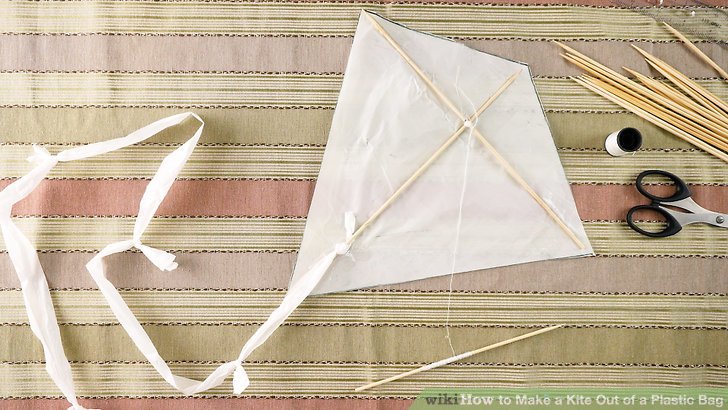
1. Make the two wooden skewers into a cross and tie them together in the middle. I usually fix them together with glue as well - since my children like throwing their kites about a lot!
2. Place the frame on an old plastic bag (paper or a paper bag works, but not quite as well).
3. Draw a diamond (kite) shape around the wooden frame and cut out.
4. Tape the frame onto the kite.
5. Turn your kite over and use a sharp pencil to make a small hole in the middle of the kite (where the wooden skewers cross in the middle).
6. Thread the end of the string through the hole and tie securely.
7. Take your Kite outside and try it out!
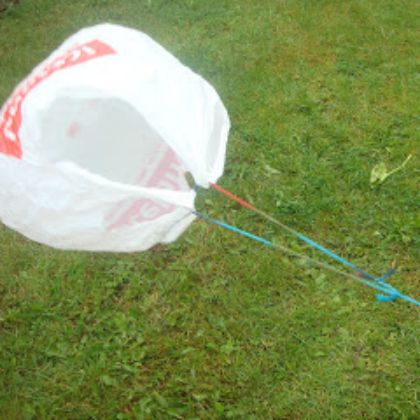
Hint: To fly your kite, hold the string and run into the wind, so the wind is blowing into your face. Pull the kite behind you and it should fly beautifully.
Good morning. WWF UK posted a fab common insect and invertebrate species in the UK. It's a great little activity. Use the poster to have a hunt around your garden - what can you see? We found many of them (including a GIANT slug!) and then my older child tried to draw an anatomically correct earwig.
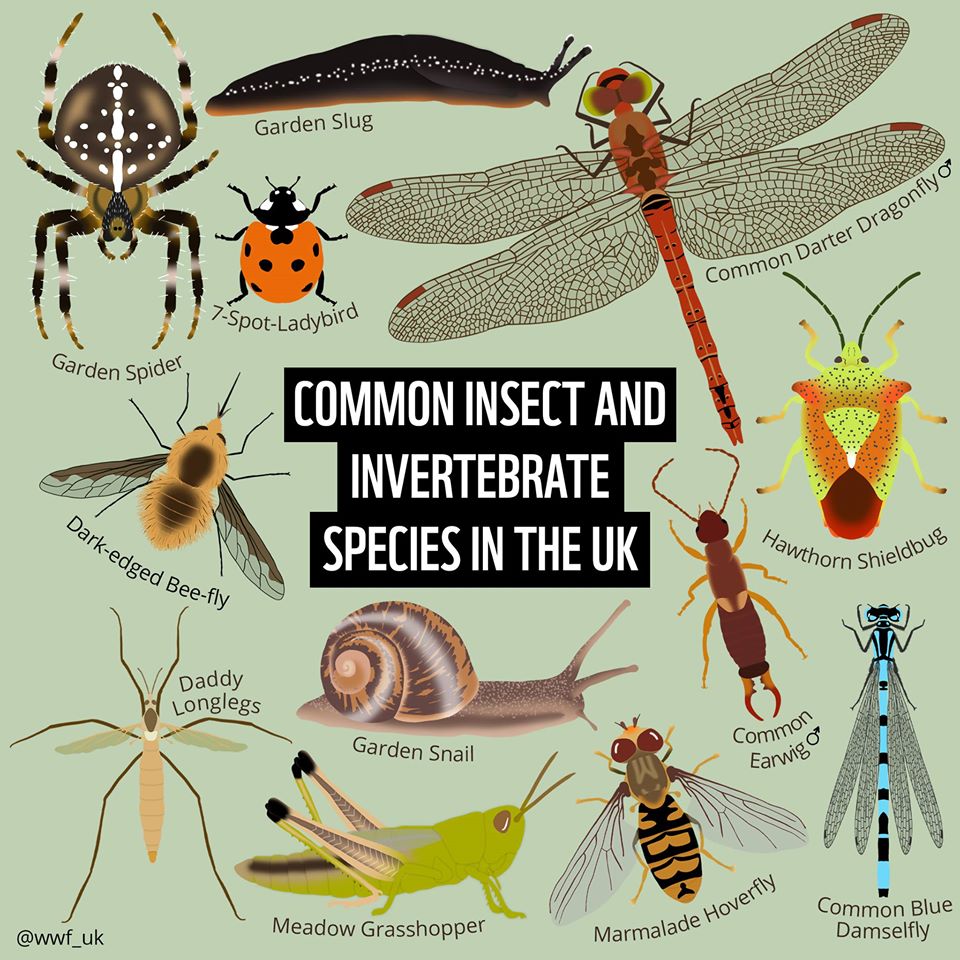
You might want to see how many you can find and then do a tally chart and (KS1) a bar chart or (KS2) a scatter chart. Some guides here.
This is a great way to do some shape recall. If your children are young, you can do some simple shapes but if your children are older challenge them. Can they make a 5 sided 3D shape? What is its name? Note: Dodecahedron!
You will need: 3 different items. If you're in a flat you might use 3 different colours of paper, or fruit on a plate. For those of us out and about, you can use 3 different items you find during your walk or in your garden. You will need quite a number of each item, so do try to avoid picking lots of wild flowers! Instead, use leaves, daisy and dandelions, sticks etc. We found lots of cherry blossom on the floor then used the abundance of dandelions and sticks we could find too!
Initially, create a couple of 2D shapes, so the children get the idea. You might need to work together for this. Lay out the outline of the flowers/sticks/leaves and then fill it in with other items you collected. Tip: its tempting to make very big shapes... don't! It takes a long time to fill them and younger children loose interest. Keep everything small and neat.
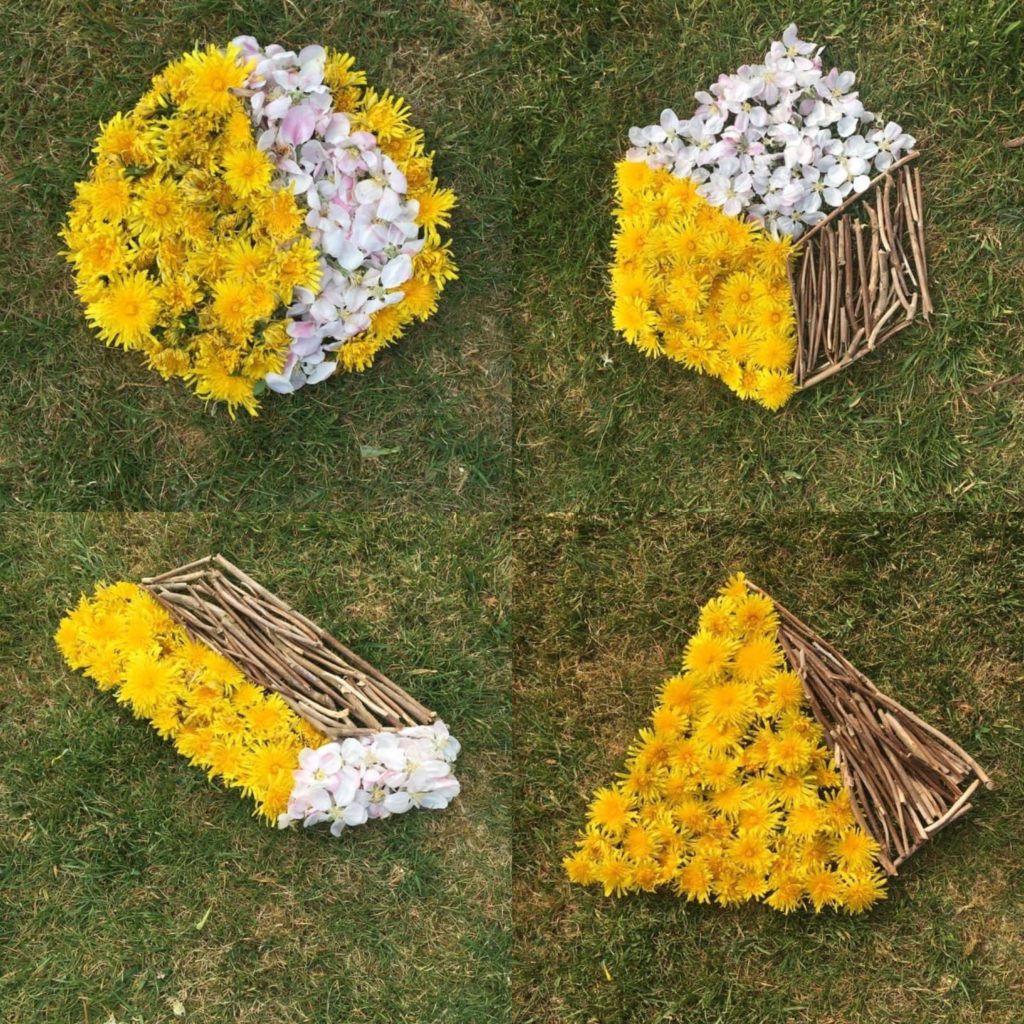
Now, see if you can work together to create a 3D shape. Think about the sides you would see. We looked at a cube we had in the house, created the outline with sticks then filled it in.
We had lots of fun with this and looked up the names of lots of 3D shapes where we didn't know them. Then we came inside and tried to draw some of the 3D shapes using a ruler.
You could then use the objects you collected to make our nature stones, repeating patterns or the sticks for our nature wind chimes.
Enjoy!
You will need: a ruler, some objects to measure - we have done this with leaves, seaweed, sticks etc. You might also want a clipboard (or something to lean on), a piece of paper and a pencil.
Plan a walk somewhere. Decide what you are doing to measure on your walk. Take a ruler with you. On your paper, you need to identify sizes. We wrote:
'big' around 13 cm
Medium around 8cm
Small around 5cm
Tiny around 3cm.
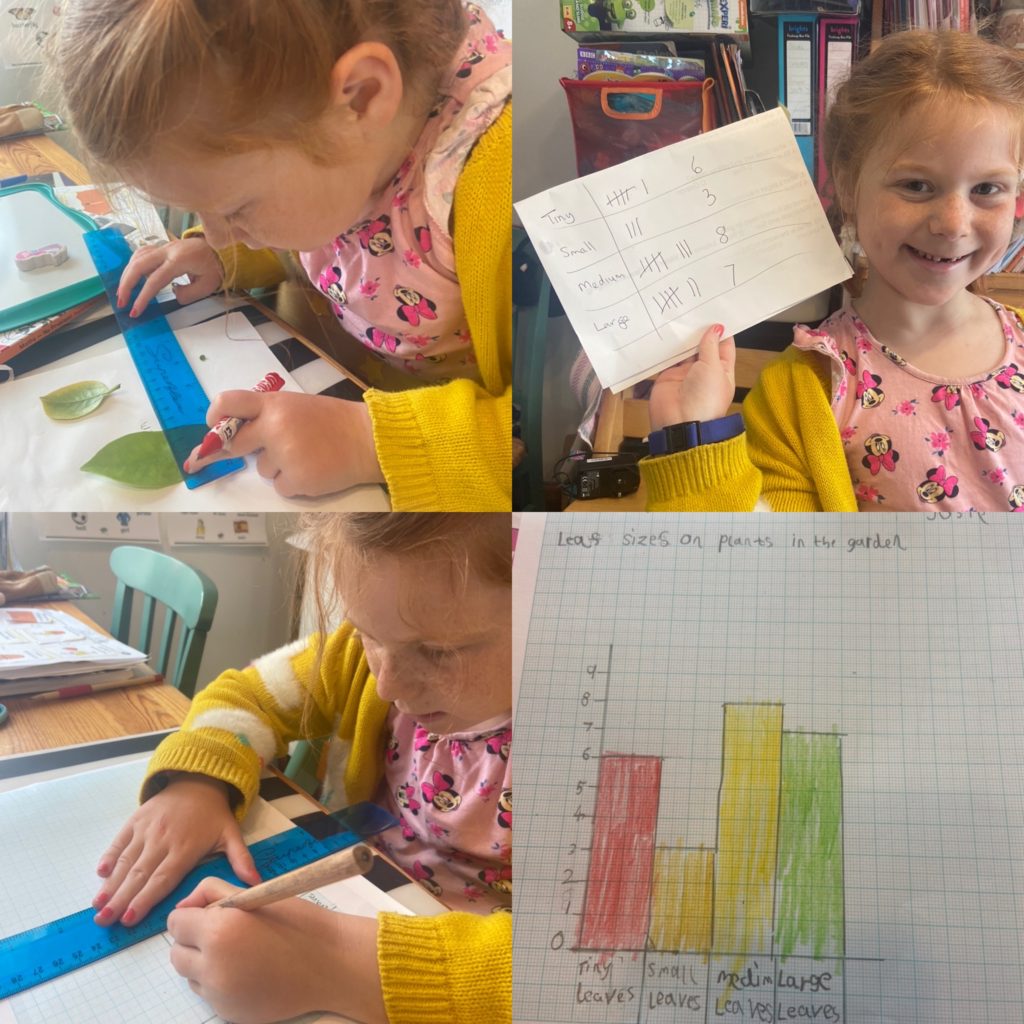
Measure each item you find on your walk. Create a tally as you measure. How many of each size did you find? My children enjoyed making groups of 5 and 10, collecting them too.
Once you return home, you might want to create a bar chart to extend the activity.
What you will need: some bendy twigs (if you can't find them, you could always use pipe cleaners), long bendy grass or stems, some plant stems, moss, leaves and feathers, a little string or twine. You might want something to use a birds eggs too ( we made ours from mud but clay would be less messy).
Collect the bits you need for your birds nest from the garden or whilst you are out walking. The sticks need to be quite bendy, so the more flexible the better.
Take 3 stems and make a star shape, crossing them in the middle. Use your string to tie the together (in the middle). Now take a piece of grass or stem and weave it around starting at the middle and working outwards, so you create a pinwheel (swirl) shape. so be creative! Use the other pieces to thread the grass and stems through in circles, to create a nest shape. Then fill holes by wearing other bits through the gaps. Next, use the moss and leaves to protect the nest and fill any holes, gaps or wonky bits. Use the moss and feathers to make the bottom of the nest nice and soft!
How did you find making the nest? Was it hard? Imagine how hard it would be with no hands and just a beak! I think birds are very impressive!
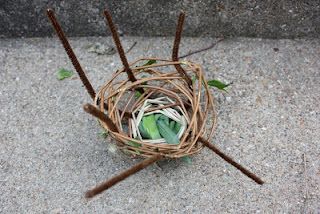
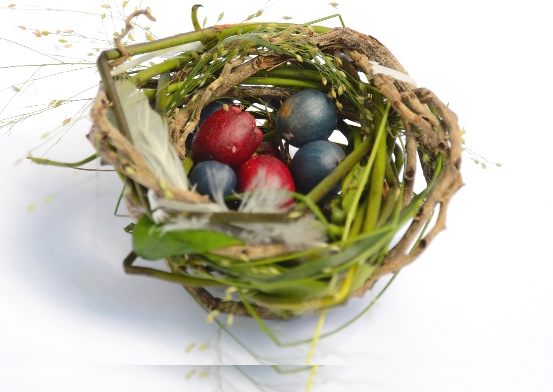
Now make some eggs and pop them in! Enjoy!
Morning! Lovely simple activity today... you can gather some bits during your morning walk, or buy them. Whatever works for you!
You will need: a jar with a lid (or plastic bottle), some soil, some tiny stones, a little sand (not necessary but helpful), and some plants. There's lots of info here about the best plants for a terrarium if you want to do it properly (and bigger!), but we often use moss, cress and then add a fairy mushroom made from some clay. Sometimes we add a "baby" from a spider plant if you can find one. My girls love that the terrarium develops so quickly using moss and cress.... use what you have!
Open the jar and lay it the way you would like. I recommend on it's side, because it makes it much easier to pop the bits in that you would like. First you need to get the layers in. You want a good layer of stones, followed by a thin layer of soil, then a thin layer of sand, and another layer of soil.... you should have clear stripes. You need the stones to stop the soil and plants rotting, so make sure you use plenty.
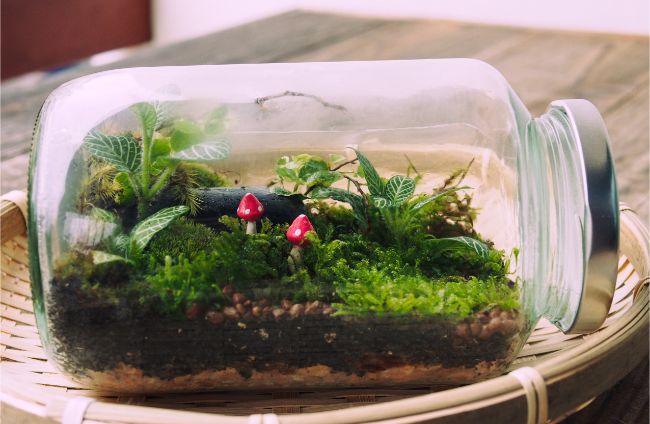
Now for the fun! spay in some water so the soil is nice and damp. Gather some moss, and pop it onto the soil in the places you want. Position all the additional bits you'd like to add (fairy or dinosaur gardens are popular here!) and then sprinkle a couple of small patches of cress seed over the top. Give the plants another spray and pop the lid on! A little BlueTac, or playDoh will stop the jar rolling.
Now, wait and watch. You should never have to water it again and you have your own little eco cycle inside. Enjoy it growing and plan the next one!
A little white ago, we made bird feeders from pine cones. This morning, we can do a very simple bird feeder. You will need: A pipe cleaner (or some wire - string will do but is harder to thread for very small people), some donut shaped cereal. Somewhere to hang the feeder. This is a great threading activity for little hands!
Take the pipe cleaner bend one end into a small 'L' shape (this will stop the cereal from falling off when it has been threaded.) Now for the threading. Take each piece of cereal and thread it onto the pipe cleaner until it looks almost full. Now bend it in a necklace shape (or an oval). Using the ends, twist together so the shape remains.
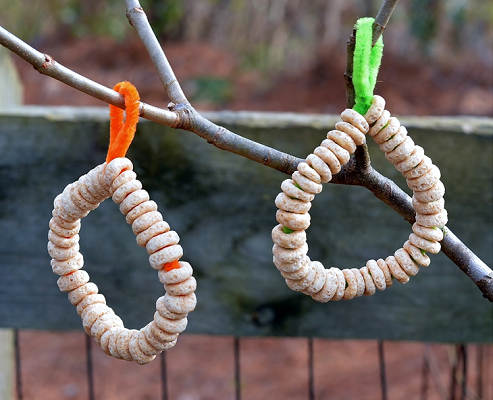
Now hang it somewhere you can see it and watch the birds enjoy the foods. You might want to use the RSPB garden bird spotting page to help you identify the birds you are spotting.
Enjoy!
You will need: Pressed flowers (click here to show how to press flowers), 2 A3 laminator pouches, an iron or laminator, some string, a hole punch.
On the laminator pouch draw the shape of a fairy wing - however your child thinks it should look. Now open the pouch. Place the pressed flowers in the places you want them and close the pouch. You can also add tissue paper shapes if you don't have enough flowers or you want other patterns.
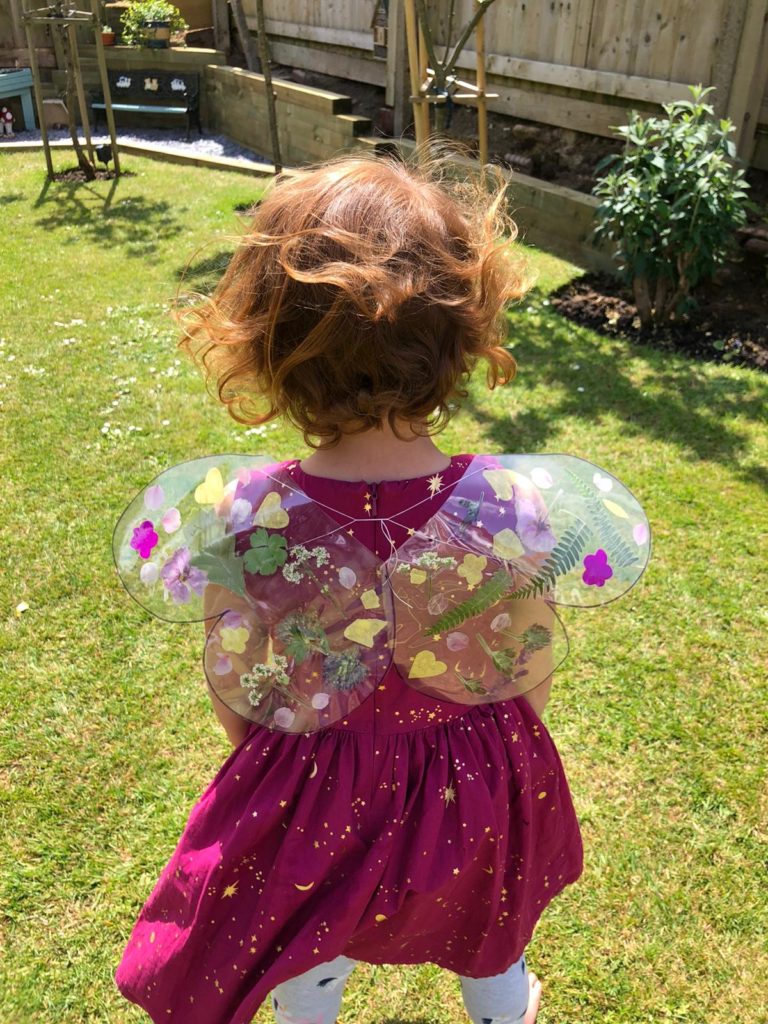
Repeat the process with the other pouch. Either laminate or place on a ironing board with a tea towel over the top and iron until sealed.
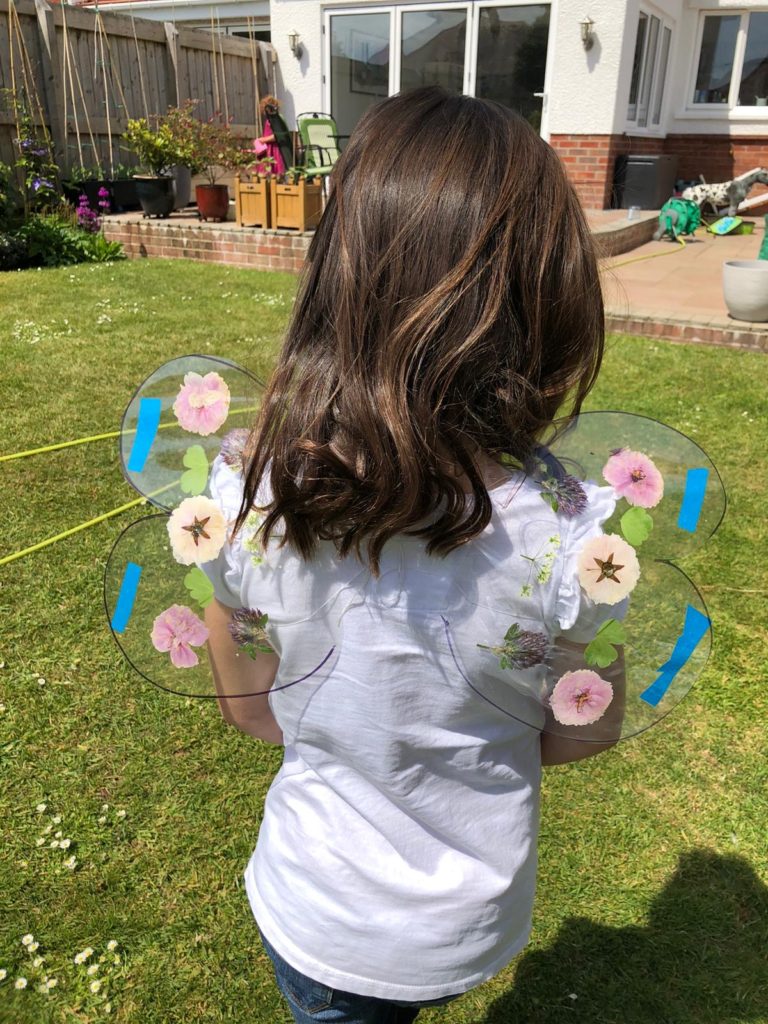
Cut out the shape of the fairy wing, and using a hole punch make two holes on the inside of the wings. Make a loop with the the string, tie them together and making a hoop so that they can by hung over a childs arms. Enjoy being a fairy.
Phew! What a wet day it is here. It's extremely rainy. Hopefully this activity works inside or out (although my children would say not much beats dressing in waterproofs and wellies and jumping in muddy puddles).
A few more resources today, but it is absolutely worth it! Air drying clay (or salt dough - recipe at the bottom of the page), pressed flowers (click here if you need to know how to press flowers), a small heat proof bowl, a rolling pin, a space to roll.
Roll out your clay/dough until it is roughly 1.5 inch thick. Now take 1 or 2 of your pressed flowers. Place them carefully on top of the dough, then roll the dough so the flowers/leaves are pressed in.
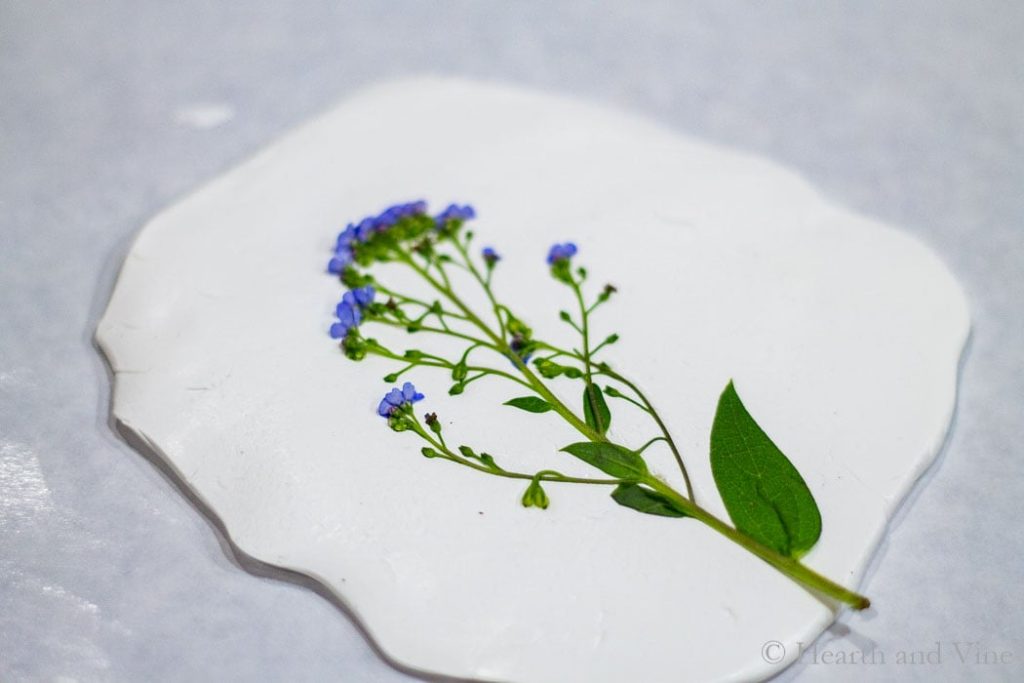
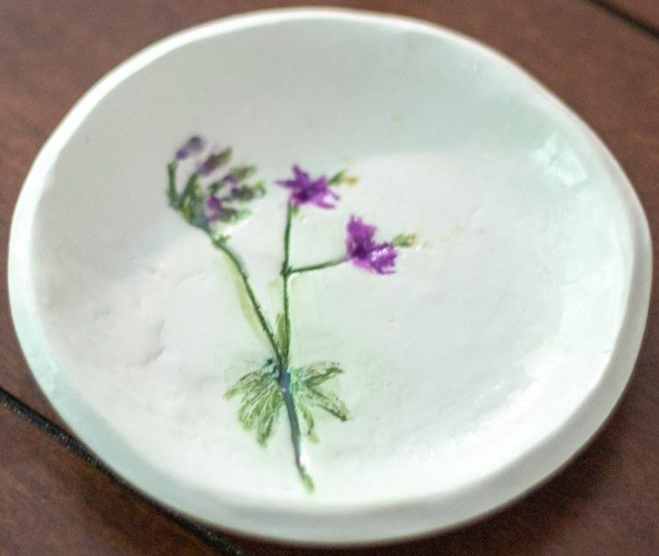
Now prepare your bowl. Use the top of the bowl to cut a circle shape with the flower in the middle, and press the dough into it, so it forms a shallow bowl shape.
You can make any shape you want really, we also made some pendants using the same method, but cutting out with play dough cutters and popping a hole in the top.
Now, if you have air drying clay, you can leave it to dry like this. If you have salt dough, you need to pop it into the microwave for 30 seconds, leave to dry for an hour, then another minute in the microwave..and repeat this process until it is dry.
How to make salt dough
You will need: 1 cupful of plain flour (about 250g), half a cupful of table salt (about 125g), half a cupful of water (about 125ml).
Mix the flour and salt in a large bowl. Add the water and stir until it comes together into a ball. Transfer the dough to a floured work surface and shape into your chosen model.
If you enjoyed this, you might also enjoy our flower tea lights, hapa zone bunting, flower bookmarks, flower sun catchers or leaf maths.
You will need: a paper plate (or some strong card), some scissors, tissue paper or sticky back plastic, pressed flowers, a hole punch (or something to make a hole) and some string.
Firstly, you need to collect the flowers. Carefully pick some beautiful flowers (ideally ones that are relatively flat already, but any will do. Once you are home, get 2 pieces of kitchen towel. Place the flowers carefully front down onto the first piece and cover with the second. Now place the heavy books (or book and heavy objects on top). Now for a bit of patience! You need to leave them for at least an hour, ideally overnight! Once they are flattened, you can dry them in the microwave. Place them on a plate and pop in for 10 second bursts until they feel like dry paper. If you don't have a microwave, you might want to leave them to dry naturally. This takes between 1-2 weeks during hot weather.
Whilst the flowers are drying, you can start preparing your sun catcher. Take your paper plate (or cardboard). gently fold in half and cut into the middle - you need to cut around the middle, leaving about 5 cm thickness for the edge of the 'window'.

Once the window is cut out, your child can decorate round the edges. Now cut the tissue paper or stick back plastic so that it overlap the edge of the paper plate when it is stuck on. Make a hole in the top and tie some string in so you will be able to hang it.
When the flowers are pressed, stick the tissue paper/sticky back plastic onto the paper plate/cardboard shape. Place them in the pattern you want over the sticky back plastic/tissue paper) and stick them down.
Hang up and enjoy! If you likes this, you might also like our flower bookmarks, flower tea lights, leaf maths and Hapa zone flower bunting.
You will need: an old bedsheets or some light colours fabric you don't mind cutting up, a hammer, kitchen roll, some flowers, a hard surface that you can bang a hammer on! Hand extras are a hole punch or a needle and thread, some ribbon or twine.
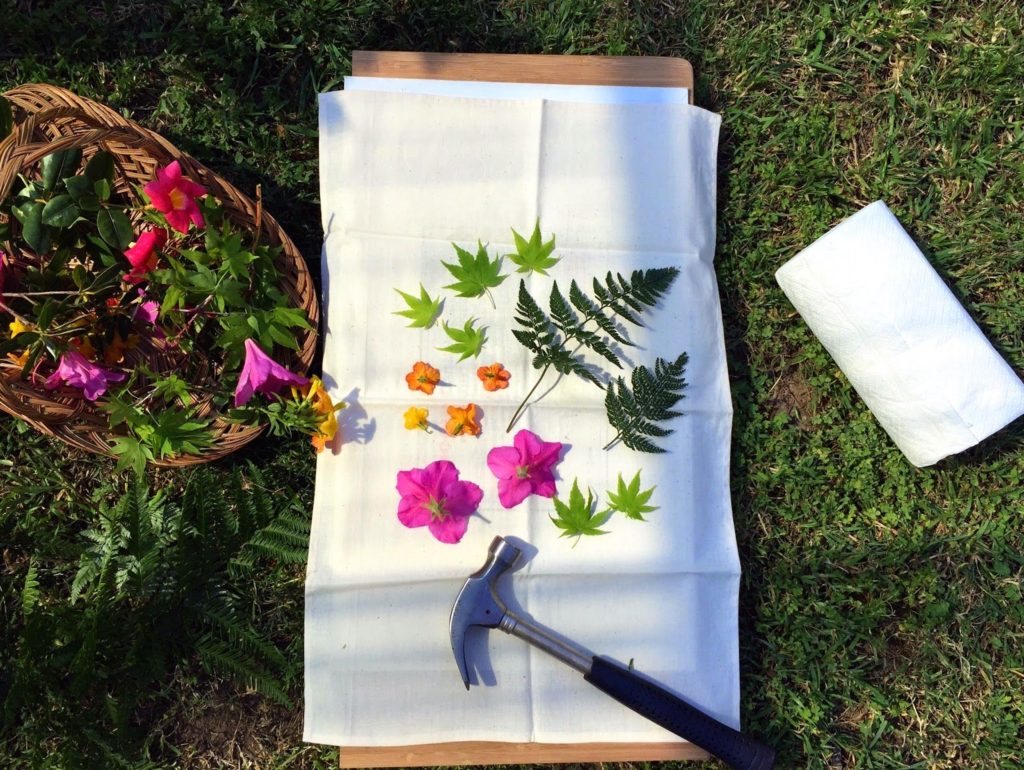
Firstly, you need to collect your flowers and leaves. We recommend you collect more than you need as this week is flower week here a Time and Tide Bell so you might also want to press the flowers for tomorrow and Thursday. If that's the case, see the post about pressing flowers here.
When you collect the flowers and leaves, try to collect ones which are relatively flat already - they make the best pictures! Next, you need to cut out triangular shapes from the fabric you already have. (although this works on anything - my children have flower t-shirts they made using the same technique).
Now for the fun bit! You need a flat surface that you don't mind getting marked when its bashed with a hammer. At the bottom place the fabric. Position the flowers where you want them, face down. Place the kitchen towel on top, then bash over and over agin as hard as you can. You know when its ready, as the picture of the flower will bleed through onto the kitchen towel. Then repeat with other flowers until it is just how you want it (it is much easier to do 1 flower at a time, than to do lots at once).

Once they are printed, leave to dry. Either punch holes through and thread some ribbon/twine onto it or sew it on. Then hang up to admire!